
By Ryan Li and Yuxuan Liang
Introduction
We are pitching “How to use a camera like an artist” for GTHow! We’ve noticed that a lot of students at Georgia Tech focus heavily on their technical studies. Many lack an accessible outlet for creative expression. A student may have pursued a creative outlet in the past or never tried one before. Today, Photography and/or Videography is highly accessible. It remains one of the most popular means of creative expression. Most people think that they need an expensive camera to capture beautiful images, but this simply isn’t true. The average smartphone today has a robust camera, and with a comprehensive education on how to manipulate exposure settings on a camera, as well as framing, we can provide GT students with the basic toolkit to pick up any camera and express themselves through photography or videography. I have a lot of experience using cameras–both for videography and cinematography, and Yuxuan has dabbled in photography as well, so we are both well equipped to communicate these complex skills to even those without any experience. This guide will lower the barrier to entry for this hobby on Georgia Tech’s campus and get our students to engage in art as well.
Table of Contents
- Introduction
- Table of Contents
- Getting/Choosing a camera
- How to use the camera
- Step 1. Finding subjects
- Step 2. Understanding exposure
- Step 3. How to adjust the overall exposure on a smartphone
- Step 4. Understanding exposure like a pro: Aperture
- Step 5. Understanding exposure like a pro: Shutter speed
- Step 6. Understanding exposure like a pro: ISO
- Step 7. Balancing Exposure
- Step 8. Focal length and lenses
- Step 9. Composition and framing
- Conclusion
Getting/Choosing a camera
The first step to using a camera like an artist is selecting which one you want to use! The most readily accessible and affordable cameras today are digital cameras, which this guide will cover.
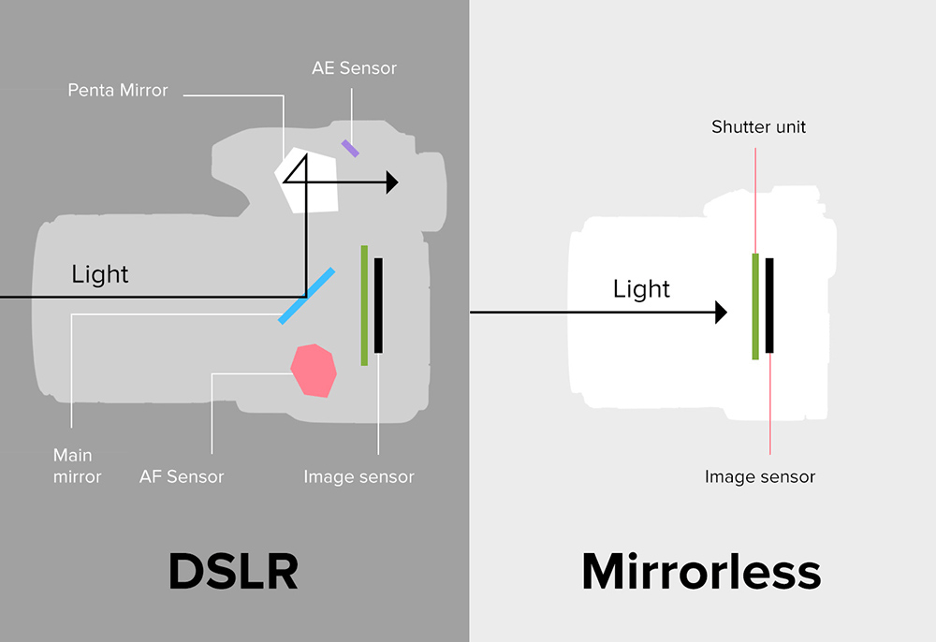
In terms of choosing a digital camera, there are two options: Digital Singles-Lens Reflex, or DSLR, and Mirrorless. It’s important to know the differences between each and which is right for you, your intended shots, and your budget!
Starting off with DSLR cameras, these are typically available at a more affordable price point, with many solid options being found at less than 500 dollars. They offer a physical viewfinder that will show your eye the direct view of the light entering your lens – kind of like a periscope. The mirror in a DSLR bounces the light from the lens through the physical viewfinder and into your eye. Many modern DSLRs will also come with an electronic viewfinder. (Figure 1a) They also have a longer battery life when using compact batteries that sit inside the camera. Combine this with a heavy, sturdy, and reliable body, and DSLR cameras make for a good partner for someone just starting out in Photography. On the other hand, Mirrorless cameras are typically on the pricier side, and have only an electronic viewfinder that shows you exactly what the lens is seeing, instead of being reflected by a mirror. As a newer design that is able to cut out the mirror, these are often more compact and lightweight compared to their DSLR counterparts, and boast a wider range of framerates to record at. This makes them a great option for aspiring videographers as many mirrorless cameras come with features and benefits like better autofocus tracking that make shooting clean videos a lot easier compared to DSLR.
Of course, both options definitely will set you back a pretty penny. The great thing however, is that most people already own a mirrorless camera! Smartphone cameras work just as well as any other, and while many people might knock certain brands for poor camera quality, the true secret to taking good photos lies not in the camera and the technology, but how one uses it.
If you’re able, we recommend grabbing your camera or phone camera to follow along with this tutorial! The best way to learn how to use a tool, is how to get hands-on experience with it! If you have a DSLR or Mirrorless Camera, set your camera to Manual mode by using the mode wheel on the top right of the camera body to set it to M. If you are using your phone camera, open your app of choice, or use pro mode if your smartphone as it built in.
How to use the camera
Step 1. Finding subjects
Before starting with anything, an aspiring artist with a camera needs to think about what they want to shoot. People? Landscapes? Objects? The subjects of your shots can literally be anything. Different subjects require different camera settings to shoot them best. Knowing what you want will allow you to use the following tools to their maximum potential. If you are following along with a camera of your own, we recommend grabbing a subject like a nearby stuffed animal or well defined object like a water bottle to practice manipulating the settings on your camera.
Step 2. Understanding exposure
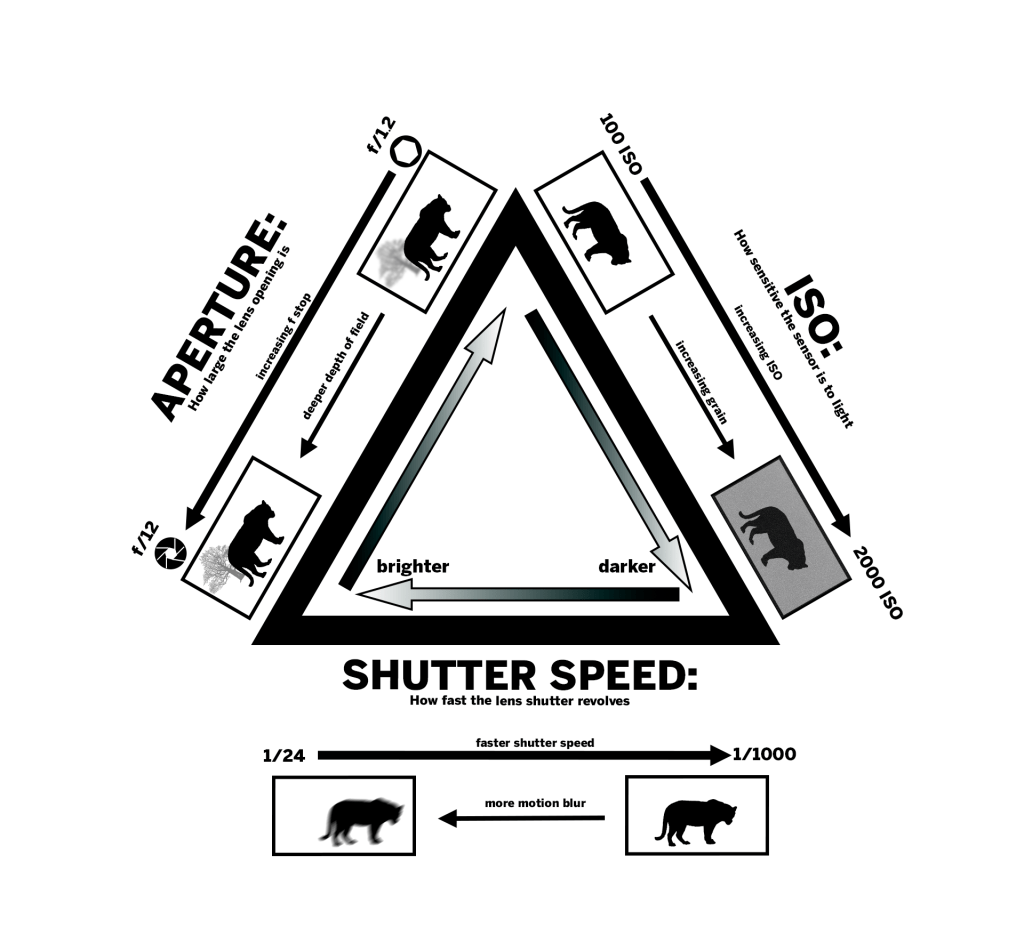
Exposure, at its core, is how much light is in the image. It is the most important thing to know how to manipulate as a photographer or videographer. In digital cameras, there are different ways to change exposure: Aperture, Shutter Speed, and ISO. Each of them can be adjusted to make your shot brighter or darker. However, the three ways of changing exposure also impact how light is captured by the camera. Understanding how to use all three to achieve the desired look is key to unlocking your camera’s full potential.
Step 3. How to adjust the overall exposure on a smartphone
Thanks to the work of smartphone developers, we can now easily adjust the overall exposure (brightness) for our photo easily. The only thing we need to do is the slide the little slider in the camera application. You can follow the tutorial below and see what over-exposure looks like and what under-exposure looks like.
However, if you are not satisfied with this basic method of manipulating exposure, you should definitely understand what the three importants factors are, and how they will affect the final presentation of your photos!
Step 4. Understanding exposure like a pro: Aperture
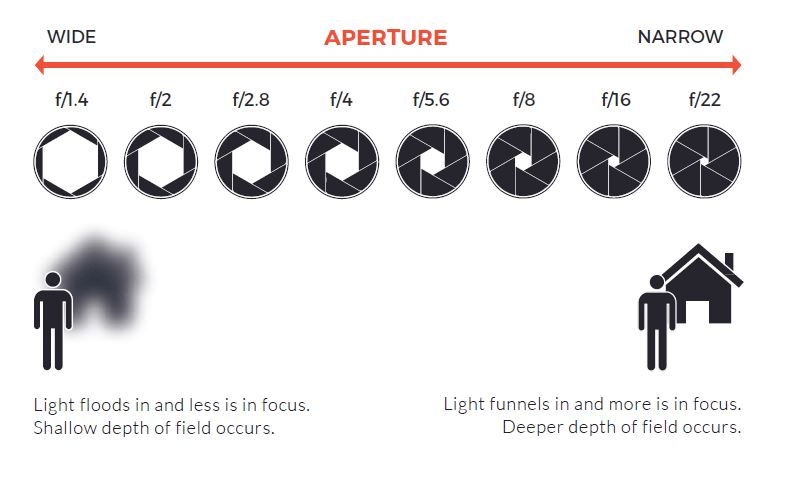
Aperture is a physical way of changing exposure. The aperture is a measure of how large or small the hole in the lens that lets in light is. Aperture is measured in f-stops, or in some cases, t-stop. The two differ in how their numbers correlate with exact distances, but the most important thing to know about aperture as a beginner is how to control it, and how it impacts both the amount of light in your image, as well as how sharp it is. On the barrel of your camera lens, the ring closest to the camera body controls how wide the aperture is, and how much light the lens is physically letting in. In cheaper zoom lenses, this is also the ring that controls the focal length or how zoomed in the lens is, which we will get into in a later section.
On a phone camera, this can be controlled through your phone’s pro mode, or an app. It’s a bit odd to understand at first, but the lower the number of the stop, the wider the aperture, and the more light the lens lets in. It’s the exact same mechanism our eyes follow when it gets dark. Our pupils will open to let more light in. When it’s really bright, they close down so we don’t get blinded.
A wider aperture comes with a shallower depth-of-field. Depth-of-field refers to how deep the field of objects in focus is in an image. A shallow depth of field means only a certain part of the image will be in focus. For example, if you took a picture of a tiger (as pictured in 2a) in front of a tree with an f-stop of 1.2, and focused on the tiger, the tree would be out of focus. On the other hand, if you were to use a higher f-stop, say f/12, you would be able to get both the tree and tiger in focus. Figures 4a and 4b below show an actual image example of how the depth of field changes.
Now you try! Grab your subject and ensure the surrounding area is well lit. If you have a camera, practice manipulating your lens’ aperture with the ring closest to the body. This may also be your zoom ring, so be sure to account for that as well! If you have a phone camera, bring up pro mode / your app of choice and use the slider to manipulate the f-stop. Notice how your image gets darker as the f-stop increases. Also see how your depth of field increases. If you are using a physical camera, it helps to look at the actual opening of the lense get wider and narrower as you control the aperture!


You can find a more detailed explaination of aperture here: Canon Europe
Step 5. Understanding exposure like a pro: Shutter speed
Shutter speed is the other physical method of controlling exposure. It refers to how fast the camera shutter is moving. It’s measured in either shutter angle or fractions of a second.
For the purposes of this guide, we will be using fractions of a second as the measurement. When you hear the “click” of a camera, that’s the sound of the shutter passing around the sensor. When shooting video, the shutter moves around the sensor constantly. The speed amount, is how long it takes the shutter to complete its revolution around the sensor. 1/48 of a second is slower than 1/1000 of a second. When using a slower shutter speed, there is more time for the camera to capture light for the image, thus making the image brighter.
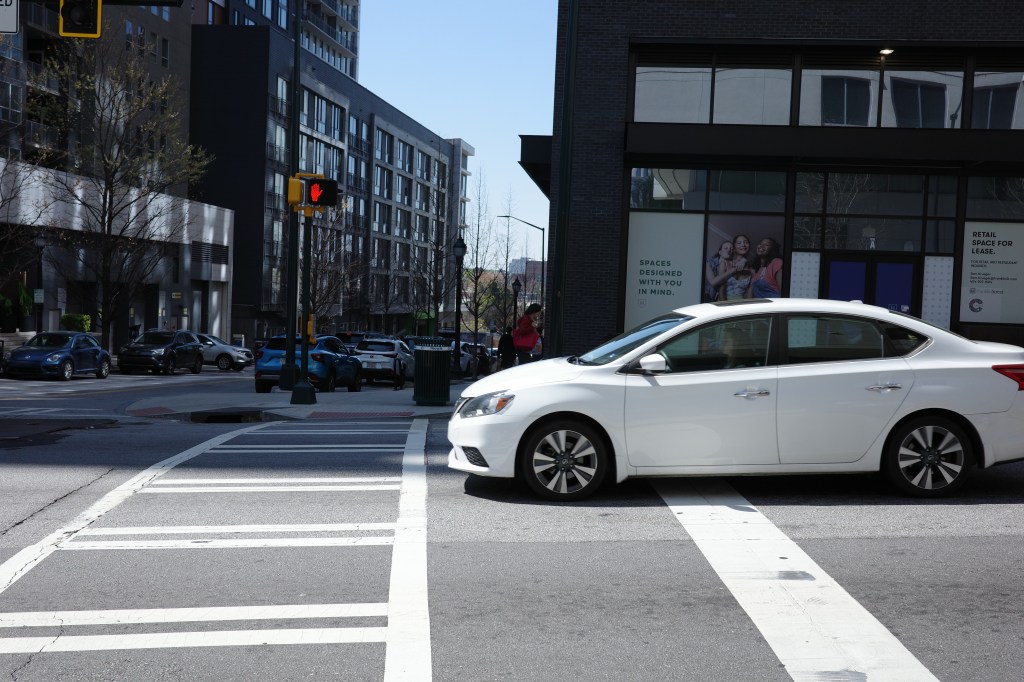
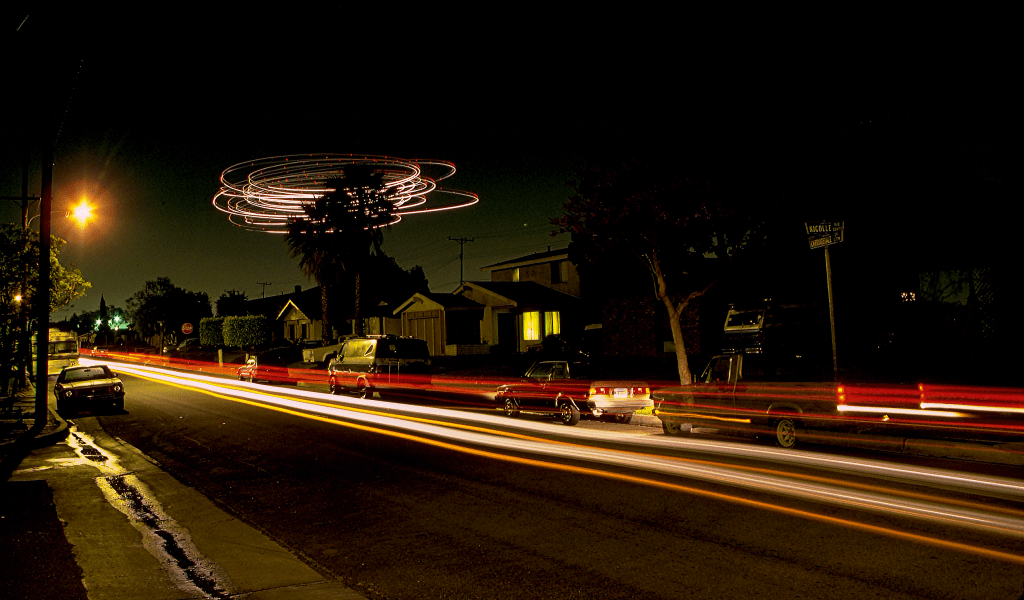
However, just like aperture, there are important considerations to how light is captured other than pure brightness. A slower shutter speed means more motion blur. This is because when the shutter takes longer to revolve, the camera is catching every change in front of it as the shutter revolves. For photography, this means that slower shutter speeds can lead to incredibly blurry pictures if shooting a moving subject (Figure 5a) or if you yourself are moving. Some advanced techniques like long exposure (Figure 5c), take advantage of this blurriness over time when using slow shutter speeds to create unique photos. Figure 5c shows how a stationary photo with a very slow exposure, likely over multiple seconds, shows the movement of lights from the cars and planes during this period. Faster shutter speed reduces motion blur (Figure 5b). When doing certain types of videography, such as for sports, smoother footage is often desired. Sports photography too, benefits greatly from a fast shutter speed. A picture captured in 1/5000 of a second can catch some of the “blink and you’ll miss it” moments in sports in the exact moment it happened with little to no blur.

Now try with your subject in a well lit area! The one you are following along with may not move, but you can still see the effect of a slower or faster shutter speed by moving yourself. Both physical cameras and phone cameras manipulate shutter speed in the settings of the camera. Refer to your camera manual on how to access the shutter speed setting as it varies from camera to camera. On your phone camera, use your pro mode or app to access the shutter speed slider. First, set your shutter speed like 1/12 or 1/24 of a second. On your phone, you can even set your exposure to multiple seconds. Then, quickly move your camera in one direction in reference to your subject, and take a picture. You should notice that your image is bright, but your subject will be blurry due to your moment (As seen in 5a). Next, set your shutter speed higher at 1/100. Do the same movement, and take a picture. You will notice your picture may be dimmer, but also smoother as the picture was captured in a much faster period compared to the lower shutter speed one.
You can find a more detailed explaintaion of shutter speed here: Canon Europe
Step 6. Understanding exposure like a pro: ISO
ISO is a digital method of changing exposure. It represents how sensitive the sensor is to light, and can be thought of as artificial brightness.
A higher ISO will increase the brightness of an image, but also introduce grain and noise. This should be the last thing you change to increase brightness, as noise can easily ruin the look of an image, or video. Ranges of ISO and noise depend on the camera you are using, so testing to see how grainy your shots turn out or consulting the manual is recommended when using a new camera.
A good tip that we have is to use higher ISOs when shooting in bright or daylight environments to balance out losing brightness from either closing the aperture down more to achieve a deeper depth of field or increasing shutter speed to achieve less motion blur. This is because grain is most obvious on the color black or dark objects, but less noticeable against white or bright colors.
Now it’s your turn! Grab your subject and place it in a dimly lit or dark area. ISO is set digitally within the menu for both physical cameras and smartphone cameras. Set your ISO low at first, like 100-400. Take a picture of your subject. You’ll notice the picture is very dark. Next, crank up the ISO to a much higher value like 6000, or even higher if your camera allows! You’ll notice the picture is much brighter, but there is a lot of visible grain.


You can find a more detailed explaination of ISO here: EOS-Magazine
Step 7. Balancing Exposure
The key to using all three sides of the exposure triangle is to balance the three to achieve the desired look in your shot while still having the right amount of light. When altering one aspect of exposure to achieve a certain look, use the other two to compensate to make the shot either brighter/darker.
In modern cameras today, both for DSLR and Mirrorless, they usually have four modes: Automatic, Av/A, S/Tv, and M. The first refers to fully automatic exposure, which will automatically adjust the three components to achieve the correct exposure. This is typically what beginners use, and how phone cameras act. However, now that you’ve learned what each aspect of exposure does, you can delve into the other modes. Av/A is Aperture priority mode, where users can set the aperture manually and the camera will set the shutter speed accordingly. SShutter prioriy / Time value, which allows users to select the shutter speed they want and the camera will adjust the aperture accordingly. Last is the fully manual mode, which allows users to fully customize the three factors of exposure. If you’ve been following along with your own camera, this is what you’ve been using to explore exposure! If you haven’t been following along, or if manipulating all three in tandem still seems daunting, using the prioirty modes is a good way to start understanding how manipulating aperture and shutter speed affects your shots. Eventually, the goal should be being able to maniupulate all three aspects of exposure in manual like second nature for maximum control!
Step 8. Focal length and lenses
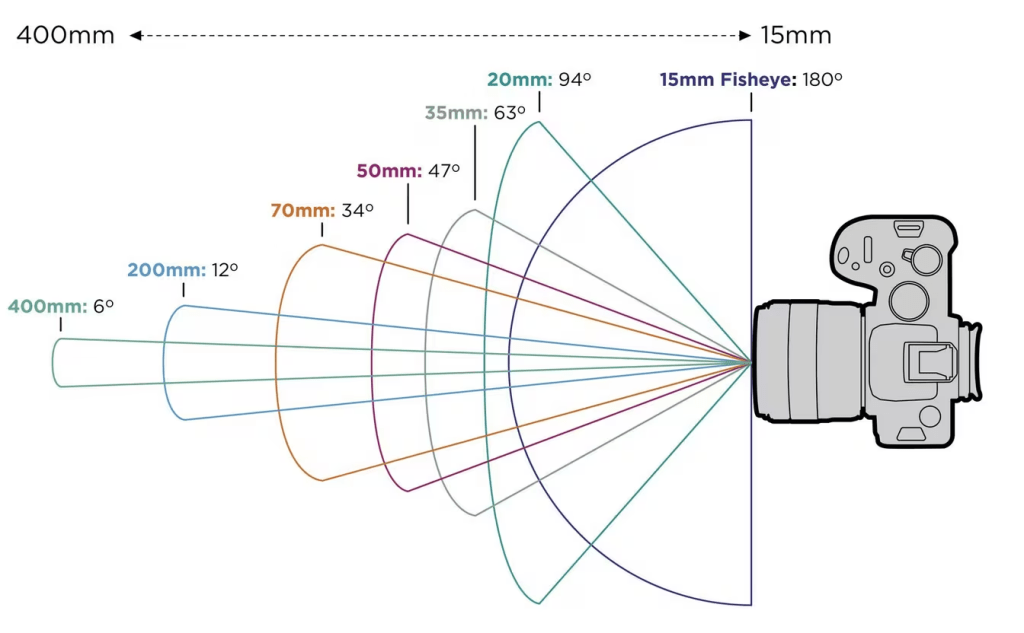
Now that we’ve taught you how to manipulate exposure, there’s one final part of your camera you should know better. Your lens is the eye that is capturing your shots. Different lenses have different focal lengths, with some able to change focal lengths. A good way to think about focal length is how “zoomed in” a lens is. A short focal length, like 24 mm will capture a wider field of view. (Figure 8a)
Step 9. Composition and framing
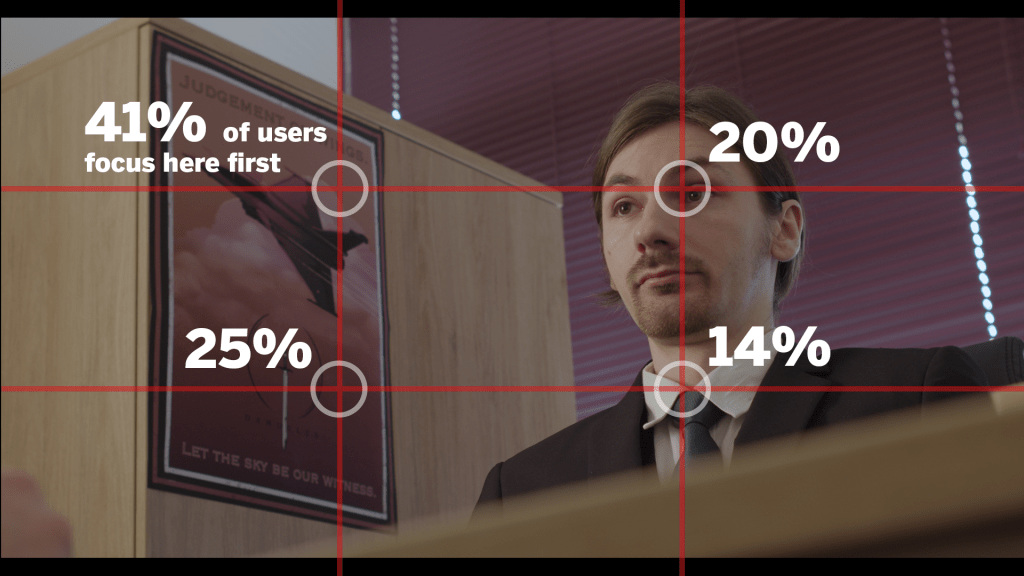
The best rule to understand when first picking up photography or videography is the rule of thirds. In the pictured infographic, a frame can be divided into three sections horizontally and vertically. This can be done for any frame size or aspect ratio. As pictured in the infographic (Figure 9a), our eyes tend to naturally gravitate towards intersections of the third lines. By placing important parts of the shot on those lines, like subjects, we can draw our viewer’s eyes to what we want them to focus on first. In the infographic, we have displayed a shot from Ryan Li’s short film, “Clean Hands”. Here, important set design pieces like the company’s poster is placed on the left third. The actor falls on the right third. This provides important context to our character and draws attention to the poster in his office first, and then to him.
Conclusion
There you have it! We’ve given you all the basic tools necessary to unlock your camera’s full potential. Any “rule” we’ve provided is more like a guideline and a good place to get started. As you grow more into your photography or videography career, you’ll find that a lot of these rules can be broken to achieve your artistic vision. For example, Ryan has used slow shutter speeds on moving subjects to mirror the feeling of confusion he wanted to capture. Understanding this toolkit also provides you the foundation for understanding more advanced techniques later down the line like the long exposure technique we mentioned in the shutter speed section. We hope this guide has inspired you delve deeper into what your camera can do, and we hope to see some of your shots out there someday!

Leave a comment