
By Ethan Saddler and Semih Saglam
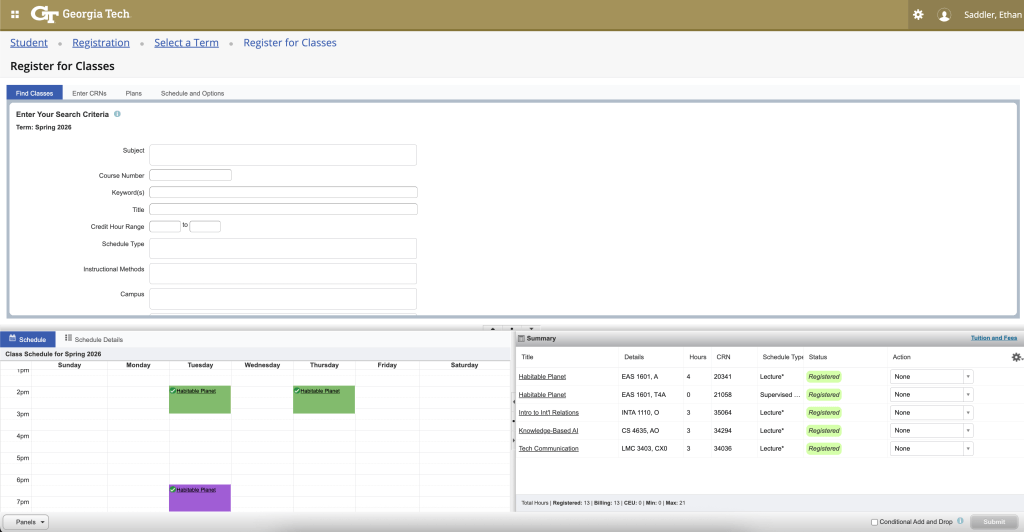
Table of Contents
- Table of Contents
- Introduction
- Understanding Important Terms
- Step 1: Degree Requirements
- Step 2: Check Time Ticket
- Step 3: Deciding on a Professor
- Step 4: Create a Schedule
- Step 5: Registration Day
- Step 6: Alternatives
- Step 7: Review Schedule and Phase 2
Introduction
Registering for classes at Georgia Tech is a stressful and confusing experience if you are not familiar with the process. New students will often have issues understanding different terms and reasons for registration issues, therefore we hope to help students make an informed plan for registration, as well as detailing any tools they can use to help with this. This is extremely relevant to students, particularly those who are new to college or Georgia Tech, as there is a very high consequence to messing up registration and at the same time, there are a lot of resources and things to consider. Selecting the correct courses ensures that you are able to graduate on time, as well as not overpacking certain semesters and having too stressful of a schedule. And while new students are the main audience, the tips we will include may be helpful to people who have done a few registrations, but haven’t heard of a certain tool or piece of advice. So our goal is to combine the knowledge we have learned, having been through many registrations ourselves, in order to shed light on how best to ensure a non stressful graduation. The guide will outline essential terminology, steps to follow before the time ticket, as well as tools that we recommend and how to use them.
Understanding Important Terms
Before registering it is critical to understand certain terms that will be used a lot.
CRN
A CRN is a code that is unique to a specific class and section. When registering, you will often use the CRN to identify and register the exact course and section you want.
Time Ticket
The date and time when a student can register. Each student is assigned their time ticket based on the number of credits they have completed.
Permit
An approval that is required to take certain courses. They are usually given to allow a student to register for a major specific course.
Linked Section
Courses that must be taken together, typically a lecture and a lab. These are required to be registered together and not independently.
Waitlist
A list of students who are waiting in line to register for the course when a class is full.
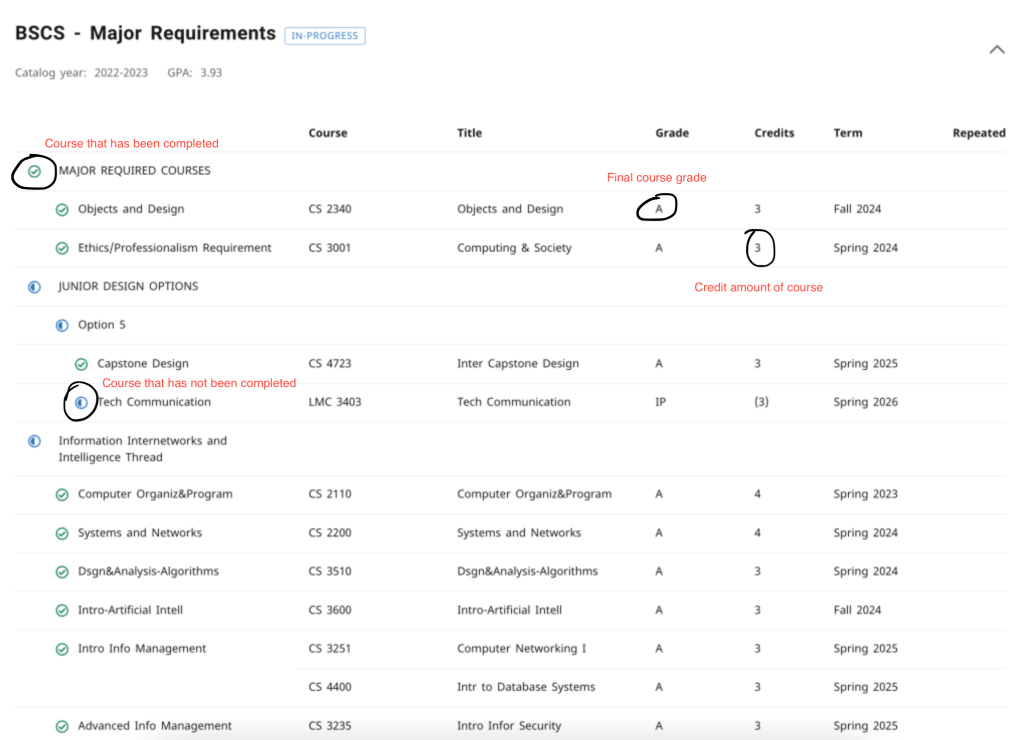
Step 1: Degree Requirements
In order to decide what courses to register for, students must consider their current degree status. To do this, the student should look at their classes on the DegreeWorks portal, which offers a detailed list of every requirement needed, and talk to an advisor if anything is confusing. This will ensure that the student will only take courses that contribute to graduation and not random classes.
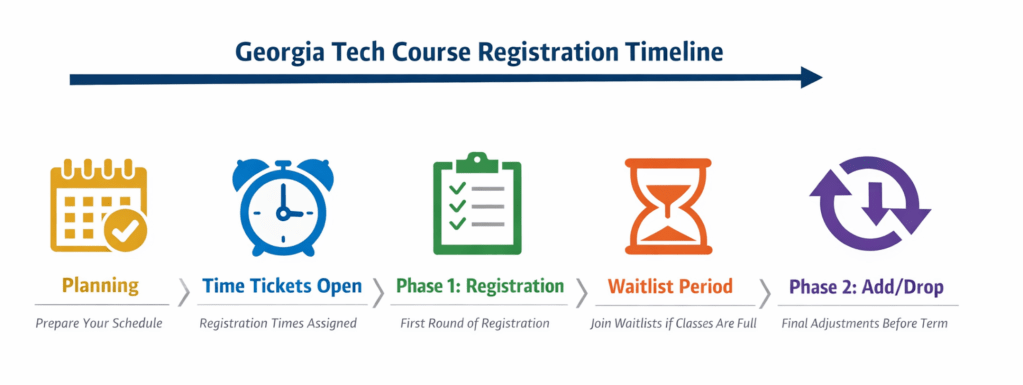
Step 2: Check Time Ticket
Georgia Tech assigns time tickets based on student classification, as well as how many credits have been earned (including any credits earned from AP tests, transfer credits, etc.).
To find your time ticket, do the following: You must access the OSCAR registration portal to view your time ticket, navigate to Student Services and Financial Aid, select registration and click view registration status. This will display the time you are allowed to register.
In order to maximize the chance of your classes being available, you should register the minute it opens.
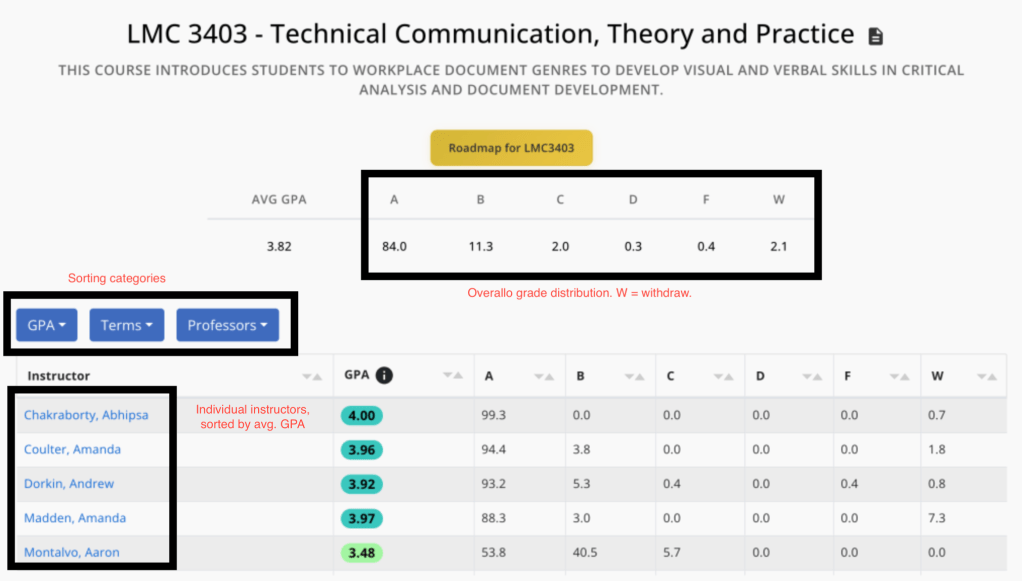
Step 3: Deciding on a Professor
In order to begin to create your schedule, you should look at professors average GPAs on GT course critique as well as rate my professor in order to get a sense of what professor you want to take. GT course critique lists the average GPAs for each professor, which can give an idea of how hard a certain professor may be.
Reading reviews on rate my professor for GT courses on the other hand has reviews from previous students; however, these can often be biased, so take them with a grain of salt.
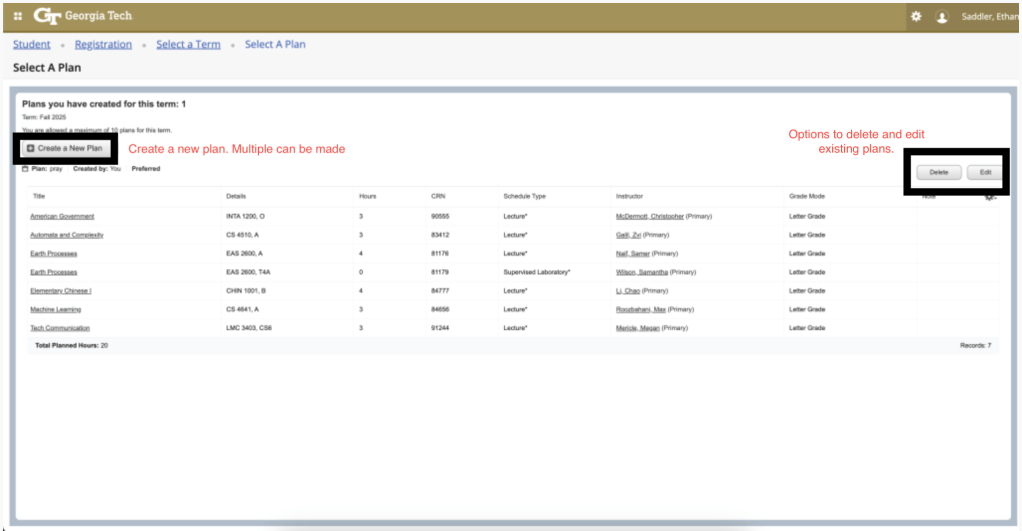
Step 4: Create a Schedule
Students should create a schedule in advance, so it is easier on registration day, and can tune the schedule to their liking. To do this, go to registration page and click plan ahead. This will allow you to create multiple schedules in advance, so if one will not work on registration day, you can create backups.
Step 5: Registration Day
Once registration day comes you should do the following:
1. You should open your laptop 5 minutes in advance and open OSCAR.
2. Once it is your time, immediately click register for classes and go to plans if you made one, and click apply then register.
3. This will hopefully register all your classes in one go; however, more likely than not some of your classes will already be full.
4. If schedule is not perfect, you will want to try to browse and find alternative sections that do not conflict with your schedule and satisfy the same requirement.
Step 6: Alternatives
If all possibilities for a certain class are full, then you have two options. The first is to register for the waitlist. This means that you will get an email if enough people drop the class that it is available to you to register for the next 24 hours typically. However, some classes will have really long waitlists and not everyone will get off it. Therefore, you may have to take an alternative course for the same requirement.
1. Many degree requirements will have multiple classes that can be taken for the same credit, so look around at some of the other courses that may not be what you had wanted to take initially, but are the only way to still satisfy the requirement.
2. You may also do both, register for an alternative class and if you get off the waitlist, drop the alternative and register for the original class.
Step 7: Review Schedule and Phase 2
After going through all of this, hopefully you have secured all the courses that you needed. This means that you have no time conflicts, the schedule is feasible (don’t want 12 hours straight of classes) and you have all the courses that keep you on track to graduate. However, at some point things will go wrong and you may end Phase 1 without getting enough classes. In this case, there is a final hope during Phase 2.
On the last day, all waitlists are removed and anyone can register for any class. So depending on how big of a deal the class is, you may just sit around and monitor the class, waiting for a spot to open and register as soon as it opens. Since many other students are doing the same, many spots will open, you just need to be quick to secure it.

Leave a comment