

By Joe Zhu and Kelly Zhou
Course registration can make a lasting impact on an academic career. There are many courses that must be taken in sequential order because a content in one course is a prerequisite material to another. Fighting for enrollment spaces for a class you want to take and creating alternate plans if you could not enroll in a particular class for the semester is also a challenge.
Understanding these nuances and how they can affect your college schedule is difficult, especially while the student is a freshman or a transfer student who is still trying to adapt to a new environment. They can get overwhelmed easily by different aspects of the course registration process at GT since it can be confusing to understand the process itself, what courses they will need to register for to fulfill their degree requirements, and how to strategize their registration process.
Our goal for our GT-How guide is to help them understand the registration process itself, sequential classes needed in degree, and other tips and tricks for registration can help reduce the frustration and anxiety.

- Step 1: Basics of Registration
- Step 2: Phase I vs Phase II Registration
- Step 3: How Major Restrictions Actually Work
- Step 4: Waitlist Mechanics
- Step 5: Free-For-All (FFA) Day Strategy
- Step 6: Permits and Overrides
- Step 7: Tools and Advice
Step 1: Basics of Registration
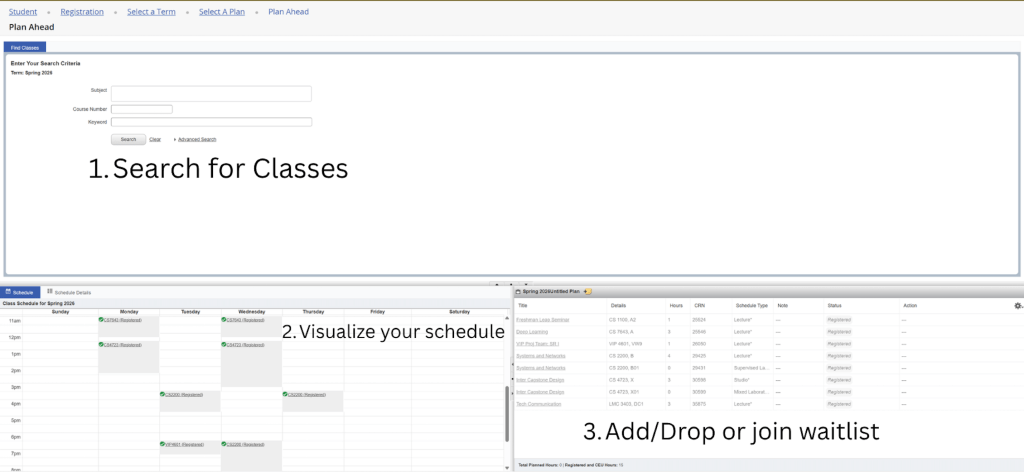
The primary tool for registration at Georgia Tech is OSCAR. This portal is where you will manage your academic schedule, from checking your specific registration window to officially adding or dropping classes. For a first-time user, the process begins long before you actually type in a course code.
Accessing the Portal
To begin, log in to Buzzport using your GT credentials. Locate the “Registration and Student Services” card on your dashboard and select the link for OSCAR. This will redirect you to secure registration system.
Identify Your Registration Window (Time Tickets)
Registration does not open for everyone at once. Your access is determined by a time ticket, which is a specific date and time when the system opens for you. Time tickets are generally assigned based on earned credit hours; the more credits you have, the earlier your ticket.
- Fall registration: Typically occurs in two phases. Phase I (for continuing students) usually happen in late March or April, while Phase II (for new students and final changes) happens in August.
- Spring Registration: Phase I usually begins in late October or November, with Phase II opening in January.
- Summer Registration: Usually aligns with the Spring Phase I timeline in March.
How to find your ticket: In OSCAR, click on the Student Services & Financial Aid tab, select Registration, and then click on Registration Status. Select the upcoming term to see your exact start time. Mark this on your calendar as popular classes can fill up within minutes of a window opening.
To get an general idea of when registration opens, you can check the current academic calendar and the current time ticket distribution schedule.
Clearing Your Account for Activity (Holds)
Before your registration window opens, you must ensure your account is cleared. If you have an active Hold, the system will physically block you from adding any courses, even if your time ticket is active.
- Common holds: These include the Emergency Contact Information update, Immunization records (common for first years), Bursar holds (unpaid fees), or Advising holds (some majors require you to meet with an advisor before registering).
How to Check: In the same Registration Status section where you found your time ticket, look for the “Holds” link at the bottom of the page. If any are listed, contact the specific department mentioned immediately to have them resolved.
The Registration Trial Run
Once your holds are cleared and you have your time ticket, use the “Look Up Classes” feature in OSCAR to find the 5-digit course reference numbers or CRNs for your desired sections. We recommend keeping an alternative list of CRNs as plan B in case your primary choice is full by the time your ticket goes live.
Step 2: Phase I vs Phase II Registration
Phase I registration starts about a month or two before the start of the corresponding semester. It is also the phase that has the most amount of restrictions. This is the phase where you want to register for classes that you are required to take and have the most priority for. During Phase I registration students are given priority levels based on credits as well as majors and such. For classes you are required to take, this is when you will get the most priority.
Phase II registration starts about a week before the start of that semester until final add/drop deadline. A lot of restrictions start to lift during this period. If there are classes you want to take, but had a restriction barring you before, Phase II is when you would get a chance. Most major restrictions are lifted sometime here although timings may vary. Use this time to get into classes that interest you, try out classes that you may or may not want to take, and make changes and finalize your schedule.
Step 3: How Major Restrictions Actually Work
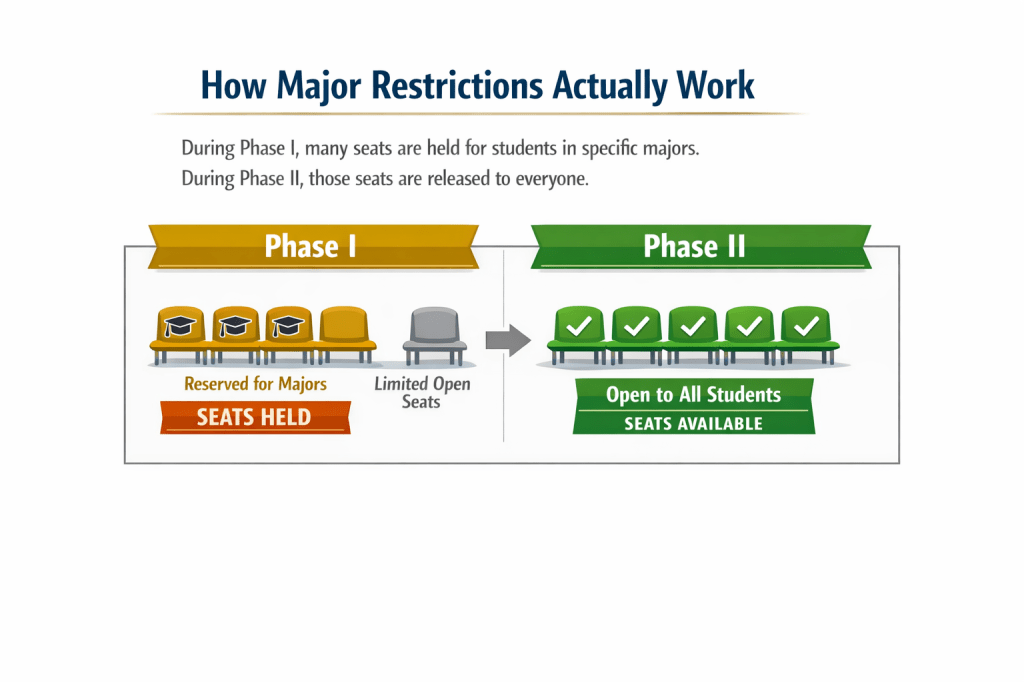
There are many courses at Georgia Tech where there is a required major that you have to be in to take.
As mentioned before, these restrictions often get lifted during Phase II of registrations. The main reason for these restrictions are for students within that major to have a chance to get into that class first.
While there are classes that you may be required to take that are not under your major’s scope, you will still have a chance to take them when restrictions are lifted or you could also ask for a permit into that class.
Step 4: Waitlist Mechanics
Waitlists are available throughout all phases of registrations, aside from a couple of days. These vary in size depending on the popularity of the class. They are used when a class hits enrollment limits and are usually first come first serve with permits being able to get ahead in time. You will be able to find what spot you are on the list by going to the registration page, then click schedule details, and it will be next to the class you are waitlisted for.
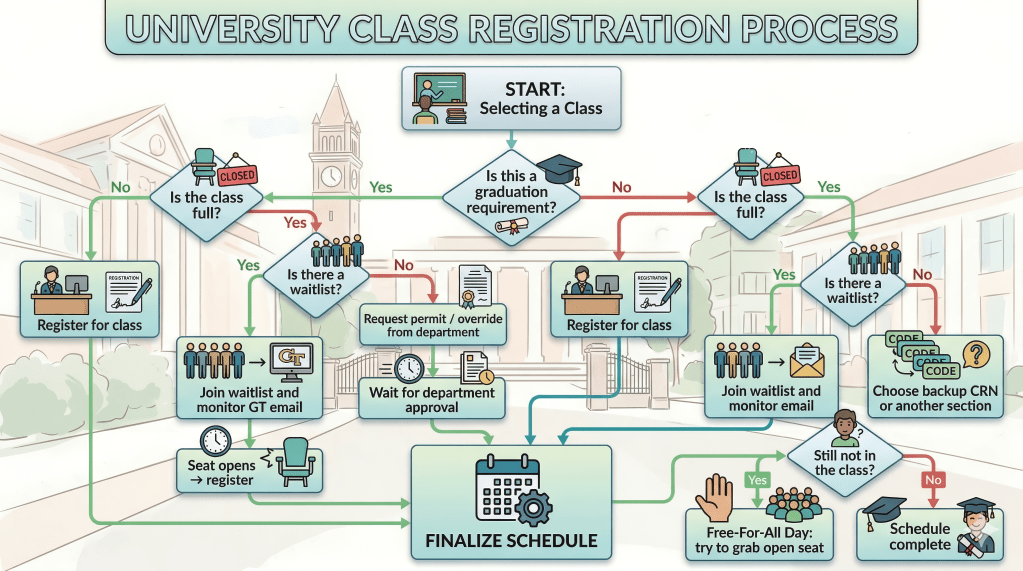
Step 5: Free-For-All (FFA) Day Strategy
The day of or the day before (subject to change) registration ends, there will be a period called free-for-all. This is when all removable restrictions are lifted, the waitlist gets purged, and you are able to get into any class that has an available seat. There is an announcement sent out about it regarding the start date and time to your Georgia Tech email, so make sure you look out for it! Use this time to fight for a spot in a class in which you were not able to get into and finalize your schedule for the semester.
Step 6: Permits and Overrides
If you encounter a red “Registration Error” in OSCAR, you will likely need a Permit (also called an Override). This is digital permission from the teaching department to bypass a specific system restriction.
- Common Error Types:
- Major/class/level restriction: You are trying to take a course reserved for a different major or year (e.g., a senior only class).
- Prereq & Test score error: You haven’t met the official prerequisites in the system.
- Duplicate Course: You are registering for two sections with the same course number.
- Closed Section: The class is full. Note: If a waitlist is available, you must join that instead of asking for an override.
- How to Request an Override:
Most Departments use the automated tool within OSCAR:
- Log in to OSCAR via Buzzport.
- Go to Student Services & Financial Aid > Registration > Registration Override Request.
- Select the Term and Course, then provide a brief, professional reason for your request.
- Monitor your status under Registration Override Request Status.
- Departmental Differences:
- Computer Science: Rarely grants overloads; you must use the waitlist.
- Math/Physics: Often require a specific form found on their own departmental websites.
- LMC: May require an email to the instructor or departmental coordinator.
- The Final Step: Manual Entry:
An approved permit does not automatically register you for the class. Once you receive the approval email, you must manually go to the Add/Drop classes page in OSCAR, type the CRN into the worksheet, and click Submit Changes to officially claim your seat.
Step 7: Tools and Advice
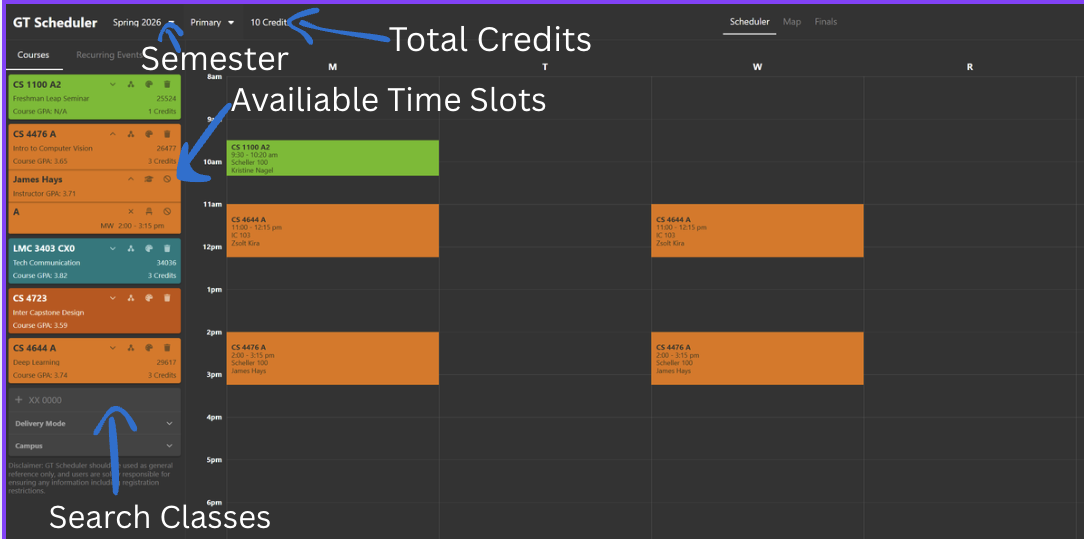
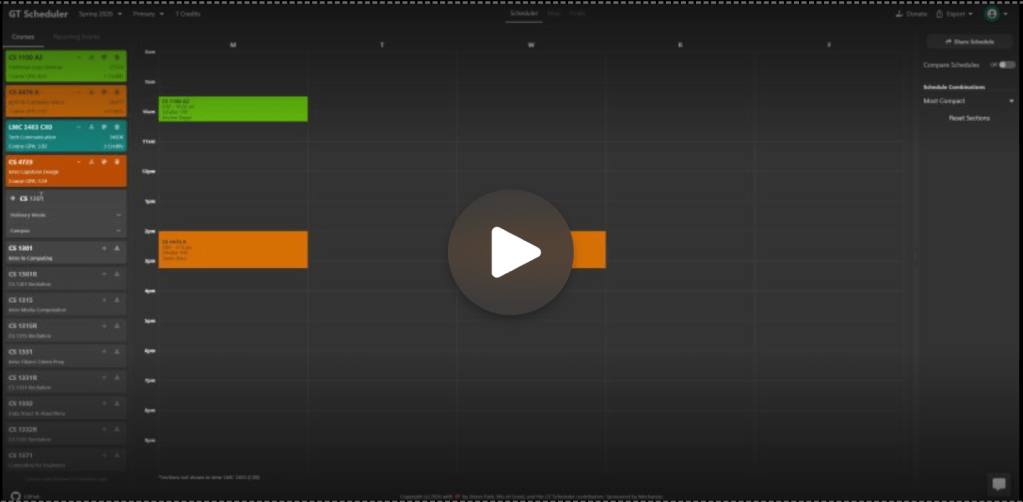
Use tools like GT-Scheduler and other course planning websites to prepare well before registration begins and to stay flexible during the process. Before your time ticket opens, you can use GT-Scheduler to map out multiple schedule options, compare professors, check historical grade distributions, and identify potential time conflicts. This helps you prioritize classes and build backup plans in case your first choices fill up quickly.
Before your time ticket during registration you are able to load all classes you are planning to take into the registration page. That way when everyone with similar time tickets as you are released for registration you are able to register for all your classes with a single click instead of needing to do them one by one.
Conclusion
Navigating Georgia Tech’s registration system is a skill that improves with every semester. By understanding the mechanics of OSCAR, staying ahead of holds, and utilizing strategic windows like Free-For-All Day, you can take control of your academic path. Remember that registration is a marathon, not a sprint—stay persistent, have your backup CRNs ready, and don’t hesitate to reach out to departmental advisors when you hit a roadblock. Good luck!

Leave a comment