

By: Nihal Kabir and Dylan Mack
Introduction
Although incoming Georgia Tech students likely have strong technical backgrounds, accessing essential IT resources on campus can be tricky and not all students can be expected to know everything they may find useful in a timely manner. We aim to help new students access PACE compute resources through a step-by step process of setting up Duo authentication, Georgia Tech VPN, and Eduroam Wifi. All GT students must feel comfortable using Duo as it’s a mandatory authentication step for accessing Buzzport and Canvas. This guide includes a tutorial for enrolling in two-factor authentication, and connecting GT account to the Duo mobile app. Upon successfully setting up Duo, students can use the Georgia Tech VPN, essential for accessing the VIP and Employee portals, which may be of great interest to students. Our tutorial gives an explanation of VPNs at Georgia Tech and step-by-step guides for setting up on different devices. GT also provides access to Eduroam (a free, secure, and reliable wifi on campus). To help students living on campus, we have provided guides for using Eduroam on computers and mobile devices. Finally, we wish to help students access and utilize PACE compute resources, which are essential for AI/ML classes and scientific research. Although new students may not be interested in such resources in their first semester, it can help with future-planning knowing that Georgia Tech provides powerful computers to students for free. We provide a walk-through for 1) Getting a PACE account, 2) Accessing PACE clusters via SSH, 3) Optimizing storage, 4) Loading required software, 5) Submitting compute jobs via SLURM, and 6) alternatively accessing through a web browser.
Table of Contents
- Understand What PACE Is
- Decide Whether You Need PACE
- Duo Setup
- VPN Setup
- Eduroam Setup
- PACE Setup
- Troubleshooting
- Next Steps
1. Understand What PACE Is
i. Overview
The Partnership for an Advanced Computing Environment (PACE) provides High Performance Computing (HPC) resources for the Georgia Tech community. PACE resources can be used by researcher teams and their collaborators, academic classes, independent student research projects, and more. The PACE team provides compute and storage infrastructure for four compute clusters, technical support services, a variety of software, workshops, and weekly consultation sessions.
ii. Compute Clusters
PACE maintains several computing clusters for Georgia Tech’s faculty, students, and staff. Each cluster has a different purpose to allow PACE to better support the needs of the Georgia Tech community:
| Phoenix ↳ Research Computing Cluster | Research cluster open to GT/GTRI faculty (academic & research). Free-tier and paid-account options available. Faculty can add students, staff, and collaborators to their accounts. |
| ICE ↳ Instructional/Educational Cluster | Educational cluster for courses teaching high-performance computing concepts. |
| Firebird ↳ Export Controlled & CUI/ITAR Secure Computing Cluster | Research cluster for Controlled Unclassified Information (CUI), International Traffic in Arms Regulations (ITAR), and export controlled data. |
iii. Request Access
To request access to one or more of PACE’s clusters:
For Research
Faculty, Graduate Students, Postdocs, & Undergraduate Students with a Faculty Mentor: Faculty advisors should apply for PACE access on behalf of their students, staff, and other individuals in their research group.
PACE Account Request Form (Research)
Undergraduate Students without a Faculty Advisor: if you would like to use our resources but do not have a faculty advisor, you can apply to the EVPR-PACE Student HPC Innovation Program (PACESHIP) program.
For Academic Classes & Other Events
Faculty can request to use PACE’s instructional cluster to provide real-world computing experience for students. ICE is also home to the infrastructure utilized by the AI Makerspace.
ICE Account Request Form (Academic Courses)
2. Decide Whether You Need PACE
PACE is not meant for personal and commercial endeavors. For those, consider applying for the PACESHIP program. Students seeking compute resources are typically interested in the Phoenix cluster and ICE cluster (which contains the AI Makerspace). Here is a comparison of the two.
| Attribute | PACE (Phoenix Cluster) | ICE Cluster (AI Makerspace) |
| Primary Focus | Traditional HPC, big data engineering, and multi-node deep learning. | Applied AI/ML prototyping, fine-tuning, and interactive deployment. |
| Typical Project Types | Computational physics, genomics sequencing, climate modeling, and aerospace simulations. | Training custom LLMs, building computer vision pipelines, and generating synthetic data. |
| Workflow Style | Non-interactive Batch Jobs: Code is queued via Slurm to run unattended for days. | Interactive Sandboxing: Live coding via web gateways (like Jupyter/Open OnDemand) with immediate feedback. |
| Core Software & Frameworks | MATLAB, R, Ansys, Fluent, OpenMP, MPI, and custom C++/Fortran binaries. | PyTorch, TensorFlow, Hugging Face, NVIDIA Omniverse, and CUDA-accelerated Python libraries. |
| Hardware Strengths | Thousands of CPU cores, massive system RAM (up to 768GB+), and various GPU nodes (e.g. A100s, H200s). | Top-tier AI accelerators (NVIDIA H100s and H200s) split into agile virtual GPU slices. |
Summary: The AI Makerspace is a shared digital sandbox built to democratize machine learning for everyday student creation. It is mainly used for deep learning, generative AI, and computer vision prototyping. The Phoenix cluster is an enterprise scientific supercomputer reserved exclusively for rigorous academic discovery. It is optimized for diverse, long-running, multi-disciplinary scientific simulation and heavy data pipelines.
3. Duo Setup
Duo is Georgia Tech’s two factor authentication (2FA) tool. To get started, first enroll in two-factor authentication. The Georgia Tech Administrative Services has provided a Duo Enrollment Tutorial with 8 detailed steps including helpful images. Follow the steps to connect your GT account to the Duo mobile app. Afterwards, check that 2FA is working by logging into Buzzport and Canvas. Should you need more assistance, check out this Two-Factor Authentication Guide by the Office of Information Technology, which includes helpful YouTube videos walking through the entire process.
4. VPN Setup
i. What is a Virtual Private Network (VPN)?
A virtual private network, or VPN, encrypts your connection to the Georgia Tech network so you can securely reach certain internal GT systems from off campus.
Most everyday services – such as email, cloud storage, and collaboration tools – do not require a VPN. However, some internal Georgia Tech systems do require a secure connection from off campus. To support these needs, the Office of Information Technology (OIT) provides students, faculty, and staff access to the GlobalProtect VPN at vpn.gatech.edu.
ii. What is GlobalProtect?
GlobalProtect is Georgia Tech’s secure remote access solution provided by Palo Alto Networks. This high-capacity, high-performance VPN solution is designed to support the needs of students, faculty, and staff with two ways to connect:
- Clientless VPN (Web Portal):
Ideal for users who only need quick access to specific web-based campus applications (e.g., Canvas, BuzzPort, DegreeWorks). This option does not require installing software. - VPN Client:
Recommended when you need full access to campus resources or applications that cannot be reached through the clientless portal.
How GlobalProtect Works
GlobalProtect provides secure remote access through two components:
1. Clientless VPN Portal
- Available at https://vpn.gatech.edu
- Accessed through your web browser
- Provides a dashboard with tiles (direct links) to popular campus web applications and lets you enter your own URL
- No software installation required
- Also provides download links for the full GlobalProtect app
2. GlobalProtect App (VPN Client)
- Installed on your computer or mobile device
- Accessed from the Windows taskbar or macOS menu bar
- Initiates connection to portal and prompts you to authenticate with your GT credentials + Duo
- Connects you securely to one of Georgia Tech’s VPN gateways hosted in our data centers
iii. Usage Guidelines
To ensure the best performance and avoid unnecessary network congestion between campus and your off-campus location, please adhere to the following usage guidelines:
- No VPN:
Use for any service (such as email, collaboration, cloud storage, and video conferencing) which can be accessed without a VPN. - Clientless VPN:
Use for web-based campus applications which require the VPN from off campus and can be accessed directly from the clientless VPN portal (vpn.gatech.edu) via browser. This helps keep non‑VPN services working normally while routing only the necessary traffic through the VPN. - VPN client:
Use for any service that cannot be accessed with no VPN or with the clientless option.
iv. Step-by-Step Setup Guides
Choose the guide that matches your device and connection type:
- Getting Started with GlobalProtect Clientless VPN
- Getting Started with GlobalProtect Client for Windows
- Getting Started with GlobalProtect Client for Windows on ARM based devices
- Getting Started with GlobalProtect Client for macOS
- Getting Started with GlobalProtect Client for iOS
- Getting Started with GlobalProtect Client for Ubuntu
- Getting Started with GlobalProtect Client for Android
- Getting Started with GlobalProtect Client for Chrome OS
Once you have the VPN set up, you are ready to connect to access PACE from off-campus, and can skip the Eduroam setup.
5. Eduroam Setup
Eduroam wifi is helpful for students living on-campus. The computer and mobile setup sections for Eduroam have complete and thorough instructions from the Georgia Tech Administrative Services. If your device is not listed, check out their Eduroam knowledge base.
i. Computer Setup
Windows 10/11 complete Eduroam setup instructions
macOS complete Eduroam setup instructions
Linux complete Eduroam setup instructions
ii. Mobile Setup
iOS complete Eduroam setup instructions
Android complete Eduroam setup instructions
6. PACE Setup
i. Confirm Access
Now that you have Duo, VPN, and Eduroam set up, you’re ready to start using PACE. If you haven’t already done so, reach out to your research advisor/PI or AI/ML class instructor to confirm access. The system should automatically create an account for you.
ii. Access Through Command Line (SSH)
Command Line Method: Open your terminal and enter ssh <your_gt_username>@login-phoenix-slurm.pace.gatech.edu (for the standard research cluster, Phoenix) or ssh <your_gt_username>@login-ice.pace.gatech.edu (for the instructional ICE cluster).
iii. Optimize Storage
Next, optimize your storage to avoid hitting strict quotas. Your personal home directory (terminal abbreviation: ~) on PACE has a very small storage quota (typically 10GB to 20GB). Large package managers and model downloads will quickly fill this up and lock your account. Immediately route your heavy caches and conda to your high-capacity (but temporary) scratch directory.
Enter line-by-line in terminal:
mkdir -p ~/scratch/.conda (if .conda folder does NOT already exist in home directory)
mv ~/.conda ~/scratch/.conda (if .conda folder already exists in home directory)
ln -s ~/scratch/.conda ~/.conda
Then enter:
mkdir -p ~/scratch/.cache (if .cache folder does NOT already exists in home directory)
mv ~/.cache ~/scratch/.cache (if .cache folder already exists in home directory)
ln -s ~/scratch/.cache ~/.cache
Note that scratch storage is typically wiped at the end of each semester, so back up important data (e.g. by saving to GitHub or GitLab).
PACE recommends that you use Globus to transfer files to and from PACE. Globus can be very buggy, so we recommend using scp or rsync as ways to transfer files to and from PACE.
In general, the structure for using rsync is as such:
rsync -a --progress <SOURCE COMPUTER>:<SOURCE FILES/FOLDER> <DESTINATION COMPUTER>:<DESTINATION FOLDER>
To check PACE storage and money left in account, enter pace-quota in the terminal.
iv. Load Required Software
PACE uses environment modules to manage software to prevent dependency conflicts. You don’t “install” standard frameworks globally; you load them into your current session.
To see all available software, enter module avail in the terminal. Alternatively, search for a specific software (e.g. module avail torch).
To load specific modules: enter module load followed by the name of the module (e.g. module load anaconda3). When possible, always include the module’s version number (e.g. module load python/3.11 and module load cuda/11.8) to ensure reproducibility in research.
To check loaded items: enter module list to see what is currently active in your session.
Only load the exact modules required for your current workflow. If you end up with a cluttered or broken environment, wipe your loaded modules completely by entering module purge. Alternatively, unload a specific module that is causing trouble (e.g. module unload python/3.11).
As login nodes restrict software loading, modules should only be loaded in bash scripts, which are described below in substep v.
v. Submit Jobs via Slurm
Never run heavy code on login nodes.
When you log in, you are on a “login node,” which is strictly for file management and script editing. Heavy computation here will be automatically killed after 30 minutes. You must request a compute node using the SLURM scheduler for heavy work. This can be done using interactive sessions or batch jobs. Interactive sessions require you to stay logged in and is limited by Wifi latency and time limits. It requires you to type commands in real time and is best for debugging, testing code, and exploratory data analysis. Batch jobs allow you to close your device and log off while the Slurm script runs in the background. They have higher priority for compute access and is NOT limited by latency. They are best for large-scale and long-running data pipelines.
Here is a visualization for understanding how batch jobs work:
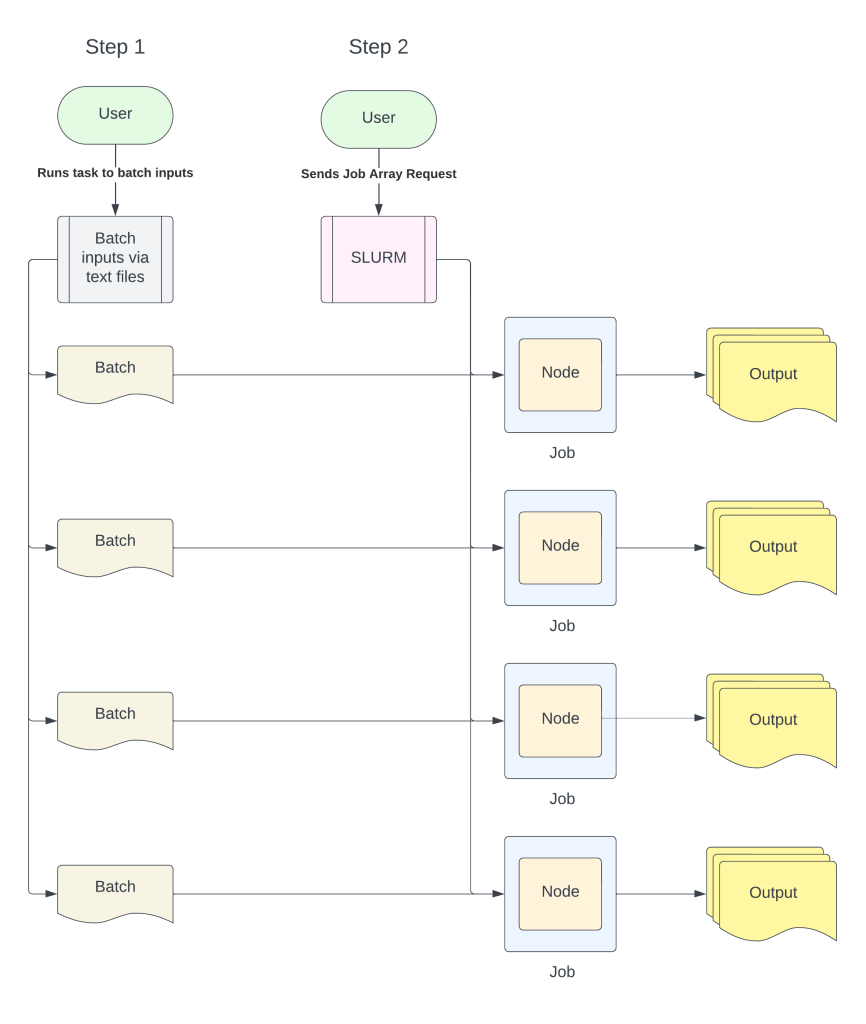
For Interactive Sessions: Use salloc to request a node for active development. Before running an interactive session, enter salloc --help in the terminal to learn about the different parameters you can add and adjust. Here is an example usage of salloc:
# Request interactive sessionsalloc --account=<your_account_name> --nodes=1 --ntasks=1 --cpus-per-task=8 --mem-per-cpu=4G --time=2:00:00 --qos=inferno# Request GPU nodesalloc --account=<your_account_name> --nodes=1 --ntasks=1 --cpus-per-task=4 --mem-per-cpu=4G --gres=gpu:1 --time=1:00:00 --qos=inferno# Exit interactive sessionexit
For Batch Jobs: Write a Slurm script as a plain text file, then submit it with the sbatch command. Any computationally-intensive command should be prefixed with srun for best performance using Slurm. Here is an example:
#SBATCH --job-name=my_job_name#SBATCH --account=my_account_name#SBATCH --nodes=1#SBATCH --ntasks=1#SBATCH --cpus-per-task=8#SBATCH --mem-per-cpu=4G#SBATCH --time=4:00:00#SBATCH --qos=inferno#SBATCH --output=job-%j.out#SBATCH --error=job-%j.err# Load modulesmodule load python/3.11module load cuda/11.8# Activate environmentsource ~/.venvs/research-env/bin/activate# Run your scriptpython train_model.py --config configs/bert.yaml
Submit it using sbatch my_job_filename.slurm.
SLURM Command Cheatsheet
squeue -u <GT_USERNAME– Checks jobs related to a GT usernamescancel <JOB_ID>– Cancels a job on PACEmodule load anaconda3– Loads Anaconda (so you can create your own conda environments)module load uv– Loadsuv(so you can create your own Python environments)salloc– Allocates resources for an interactive job. Specify resources with flags like--nodes,--ntasks-per-node,--time,--gpus,--gres, etc.sbatch– Submits a job to the queue. Requires a.sbatchfile.
Common SLURM Parameters
# CPU jobs--nodes=1 # Number of nodes--ntasks=1 # Number of tasks (usually 1 for Python)--cpus-per-task=8 # CPU cores per task--mem-per-cpu=4G # Memory per CPU core--time=4:00:00 # Wall time (HH:MM:SS)# GPU jobs--gres=gpu:1 # Request 1 GPU--gres=gpu:rtx_6000:1 # Request specific GPU type--gres=gpu:2 # Request 2 GPUs# Memory options--mem=32G # Total memory for job--mem-per-cpu=4G # Memory per CPU core
vi. Alternative: Access Through Browser
The browser method is much simpler for first-time users, but is more limited in its functionality. To access, first go to GT’s Open OnDemand Guide.
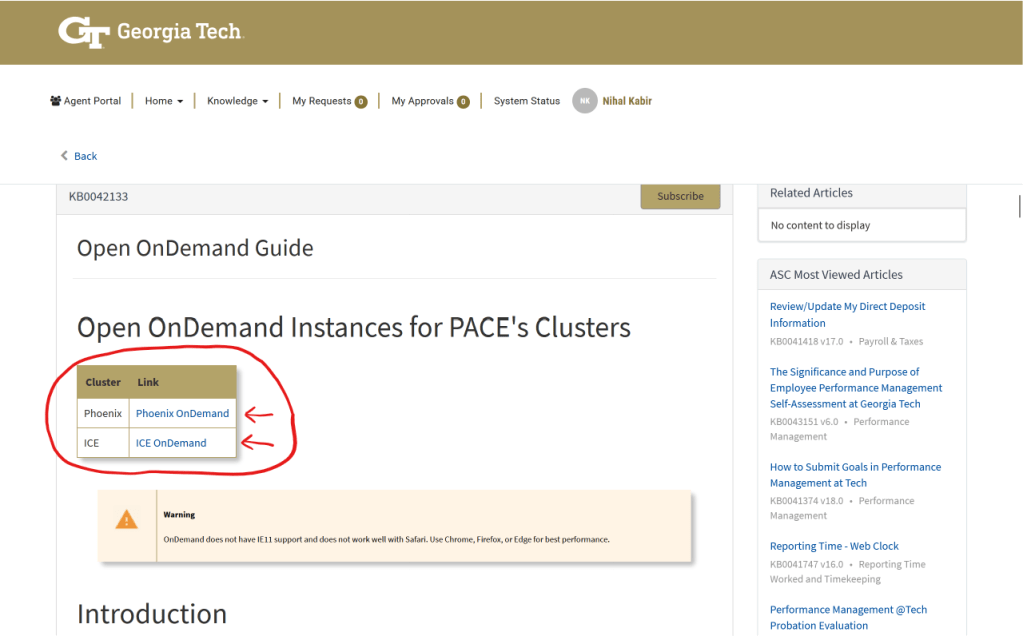
Then click on the link corresponding to your provisioned cluster (note that the link will only work if your account is actively registered with PACE). You should then see a home page as such (example for Phoenix cluster):
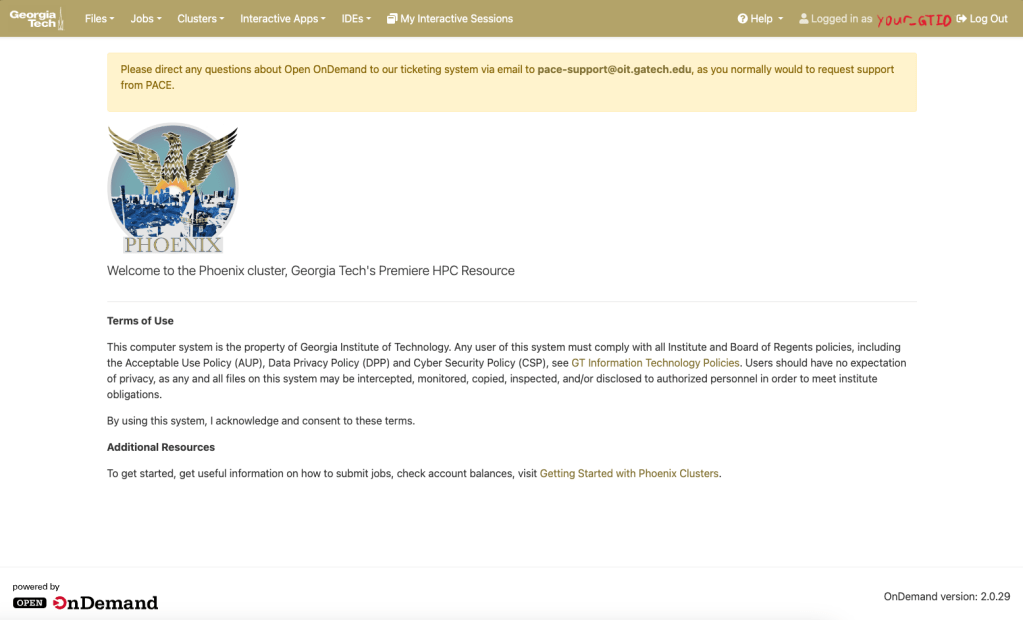
From here, you can manage files, run jobs, and use interactive apps (e.g. Jupyter, Matlab, RStudio, Interactive Shell, VSCode IDE/Editor).
vii. Check Documentation
For more advanced usage and comprehensive notes and troubleshooting, check out Intro-To-PACE-ICE by Gururaj Deshpande and PACE Cluster Documentation by the Georgia Tech Administrative Services.
7. Troubleshooting
i. Issues with Duo
When using Duo, students may encounter issues with cookies and timeouts. Old cookies can lead to previous login sessions interfering with new logins, even after reopening the browser. The best way to proceed is to clear the browser cookies and refresh. Also of note, timeouts occur when a user clicks away for a few seconds or longer before a Duo authentication completes. This will lead to a failed authentication. The solution is to simply reinitialize the Duo push and wait for the authentication to complete. For other issues, check out these 2FA Knowledge Articles.
ii. Issues with VPN
When utilizing the Georgia Tech VPN, students may have trouble with connecting. In such a situation, the student should first try switching the gateway, as demonstrated in this article. If still experiencing connection issues, check out the IT Service Status page from the Office of Information Technology or IT Alerts from the Technology Services Organization.
iii. Issues with Eduroam
Wifi issues are typically out of the control of students, but they should know where to check for maintenance and IT status alerts for known outages and plan accordingly. If none are found, it may be beneficial to restart your device or forget the Eduroam network and reconnect/login.
Next Steps
Hopefully by now you have set up Duo authentication, accessed the Georgia Tech VPN, connected to Eduroam Wifi, and possibly even ran a job on PACE. If not, don’t panic. PACE can seem daunting, especially if you have limited understanding of parallel processing and no prior exposure to command-line scripting. If at this point you don’t feel comfortable with using a shared compute system, we recommend experimenting and breaking stuff on your personal machine. While an interactive browser can act as training wheels for starters, it’s beneficial to understand how each action in the webpage maps to a line/snippet of code in the terminal. We recommend starting simple and following basic templates for filling in the blanks. Checking documentation and using the --help flag is critical for understanding different commands and building independence.
If you feel comfortable with scripting and using shared compute systems but still have questions or are having trouble with PACE, you can email the pace support team at pace-support@oit.gatech.edu.


Leave a comment