

Introduction
Welcome to Georgia Tech, where your first true engineering challenge isn’t in a lecture hall, it’s on your web browser. For incoming undergraduate students, the institute’s course registration ecosystem can feel like a labyrinth of disconnected portals. Navigating between BuzzPort, Oscar, and College Scheduler under intense time constraints frequently results in critical scheduling errors, missed sections, and avoidable registration holds. This disjointed technical workflow turns what should be a straightforward administrative task into a high-stress hurdle that directly impacts your academic timeline and mental well-being.
This guide serves as your strategic blueprint to conquer the registration process. By translating fragmented institutional procedures into a centralized, highly scannable roadmap, we eliminate the guesswork from schedule planning. You will learn how to audit your account for hidden holds, build optimized schedule permutations, deploy precise sequence execution during your time ticket window, and rapidly resolve common registration error codes.
Mastering this interface is an essential technical literacy skill for every Yellow Jacket. Efficiently managing this stream of data ensures you secure the foundational courses required for your major while avoiding the stress of cascading waitlists. Let’s look at how you can optimize your schedule workflow and take complete control of your academic journey from day one.
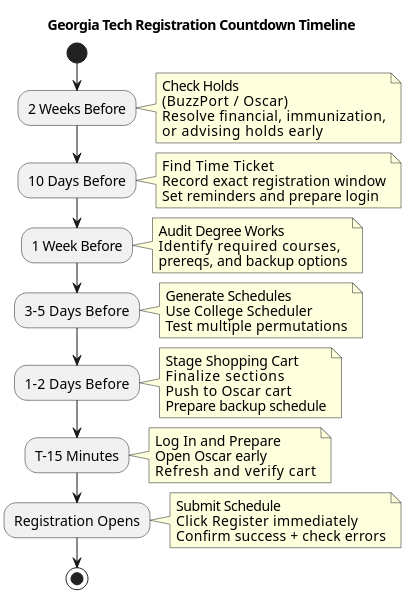
Table of Contents
- Introduction
- Table of Contents
- Phase 1: Pre-Registration Auditing and Preparation
- Phase 2: Constructing Your Optimal Schedule Permutations
- Phase 3: Live Registration Execution
- Phase 4: Post-Registration Troubleshooting
Phase 1: Pre-Registration Auditing and Preparation
Step 1: Check for Registration Holds
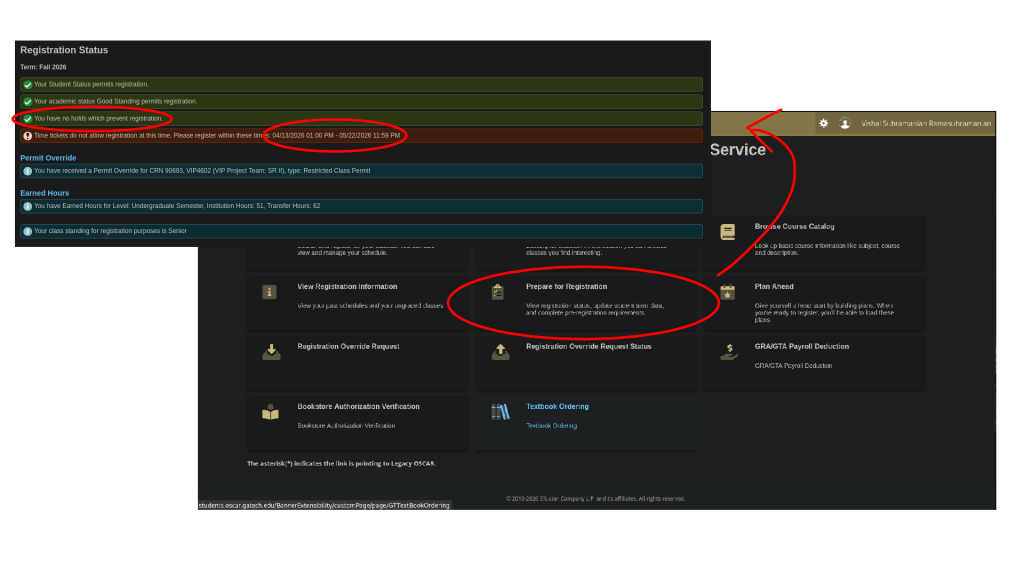
Before you even think about building a schedule, verify that your account is eligible for registration. Log into BuzzPort and open the Oscar registration portal. Navigate to Registration Status and carefully review the Holds section. Common holds include unpaid balances, missing immunization records, mandatory student agreements, and advisor requirements. Even a single unresolved hold can prevent you from registering when your time ticket opens. Resolve any issues as early as possible, since some holds require action from another office and may take several business days to clear. Completing this step at least two weeks before registration protects you from last-minute surprises that could cost you seats in high-demand courses.
Step 2: Find Your Exact Time Ticket
Your registration time ticket determines the exact date and minute you are allowed to begin registering for classes. Within Oscar, locate the Prepare for Registration page and note both the opening and closing times of your registration window. Record this information in your calendar and create multiple reminders, including one for the day before and another for fifteen minutes before registration begins. Many students miss preferred sections simply because they underestimate how quickly classes fill. Knowing your time ticket in advance allows you to prepare your schedule, log in early, and begin registration the moment your window opens.
Step 3: Audit Degree Requirements
Effective registration starts with understanding what courses you actually need. Open Degree Works and review your degree audit carefully. Identify required courses for your major, prerequisite chains that may affect future semesters, and any general education requirements that still need completion. Create a prioritized list consisting of essential courses, desirable electives, and backup options. This is made easier through the Plans tab, where you can select future courses and see how they can be applied to your degree. This preparation is especially important because some classes may fill before your registration window begins. Having alternatives ready ensures that you can quickly adjust your schedule without delaying graduation progress or missing important prerequisite sequences.
Phase 2: Constructing Your Optimal Schedule Permutations
Step 4: Generate Schedules in Registration Planning
Once you have identified your target courses, use Georgia Tech’s Registration Planning tools to explore scheduling possibilities. Enter all desired courses, using the scheduler in Registration Planning. Tools like gt-scheduler can be help. Generate multiple schedule combinations and compare them based on factors such as class spacing, instructor preferences, commute time between buildings, and overall workload balance. Rather than settling for the first available schedule, use the planning tools and external tools like CourseCritique and RateMyProfessor to identify several strong options that fit your academic and personal needs.
Step 5: Lock Preferred Sections and Save Plan
After reviewing your schedule options, select your preferred course sections and save them in the planning system. Prioritize instructors, meeting times, and recitation sections that best align with your goals. College Scheduler allows you to narrow down results and preserve specific combinations for registration day. Once you have finalized your preferred schedule, use the Save button to save your selections into the planner. This creates a registration-ready plan so that you do not need to search for CRNs or sections while registration is actively taking place. Saving a primary plan and at least one backup plan can dramatically improve your chances of securing a complete schedule.
Phase 3: Live Registration Execution
Step 6: Execute Registration at Launch Time
When your time ticket opens, log into Oscar several minutes early and navigate directly to your prepared shopping cart. Refresh the page at the start of your registration window to ensure the system recognizes your eligibility. Review your selected courses one final time, then click Register or Submit Changes immediately. Registration at Georgia Tech can be highly competitive, particularly for introductory STEM courses and popular electives. Students who spend valuable minutes searching for courses often lose seats to those who prepared in advance. A preloaded shopping cart allows you to complete registration in seconds rather than minutes.
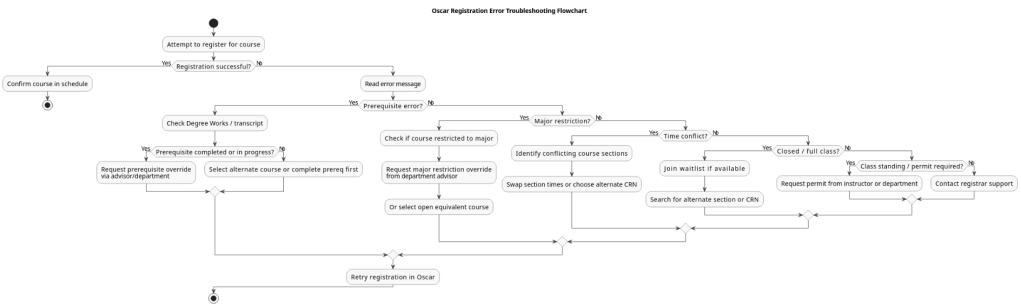
Phase 4: Post-Registration Troubleshooting
Step 7: Verify Success and Join Waitlists
Submitting your registration request is not the final step. Carefully review your schedule summary and registration results to confirm that each course was successfully added. Look for error messages, credit-hour issues, time conflicts, or courses that failed to register. If a required course is full, immediately join the waitlist if one is available. Waitlists often move significantly during registration periods, especially as students adjust schedules and drop classes. Monitor your Georgia Tech email regularly because waitlist offers typically have strict acceptance deadlines. Acting quickly can mean the difference between securing a seat and waiting until a future semester.
Sources:
https://oscar.gatech.edu
https://degreeaudit.gatech.edu
https://registration.banner.gatech.edu

Leave a comment