
By Tanishka Mehta and Aria Sharma
Table of Contents
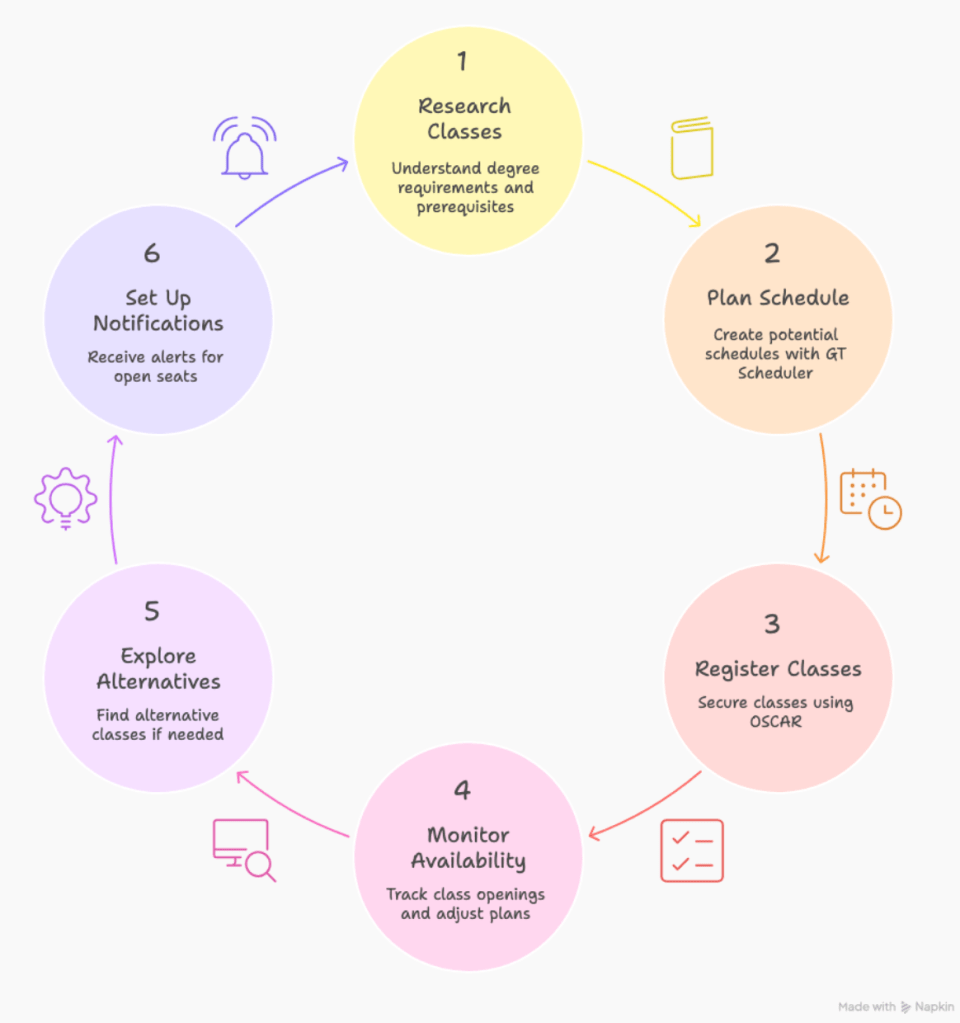
- Introduction
- Researching Classes
- Planning Your Schedule
- Registering for Classes
- Post-Registration
- Summary
Introduction
Figuring out how to create a class schedule in college can feel overwhelming, especially as a freshman. Many introductory courses have numerous professors, different timings, various buildings, and even prerequisites or corequisites. Our tutorial will walk students through how to create a schedule that optimizes their time and works with their personal preferences. We are going to break down strategies that help balance core classes with electives, work around mandatory labs, and still leave time for extracurriculars and other commitments.
With classes filling up within minutes of releasing open spots, it is imperative for students to go into registration with a definite plan. We’ll talk about the step by step process that starts with figuring out graduation requirements on Degreeworks, conducting research on said requirements in Course Critique, creating plans on GT Scheduler, and selecting professors that appeal to students the most. The goal is to take a process that can seem daunting at first, and transform it into a smooth process that helps create a schedule tailored for you.
Researching Classes
Before planning your schedule for the semester, the first phase is to understand which classes you need to take and how they fit into your degree progress. Researching classes helps you stay on track for graduation, identify any prerequisites you must complete early, and organize your academic plan.
Step 1: Meeting with Your Advisor
Start by scheduling a meeting with your academic advisor through Navigate. Although you don’t have to do this in order to register for classes, it is highly recommended to ensure you take any required prerequisites and plan to graduate on time. It is also a great resource if you are unsure about your path towards graduation. Your advisor can help you do the following:
- Verify degree and class requirements for graduation.
- Discuss electives that align with your interests.
- Review any AP, IB, Dual Enrollment, Transfer, or other fall through credits that apply to your degree.
- Clarify which classes are prerequisites for future upper-level courses.
You can also check DegreeWorks before your meeting to identify any outstanding requirements and prepare specific questions.
Step 2: Identifying All Required Classes
Create a list of every class you need to complete your degree. Open DegreeWorks and find the following:
- Core courses.
- Major requirements.
- Concentration or thread-specific classes.
- Remaining humanities, ethics, or free electives.
Having this list helps visualize the big picture, making it easier to plan future semesters and avoid last-minute scheduling conflicts.
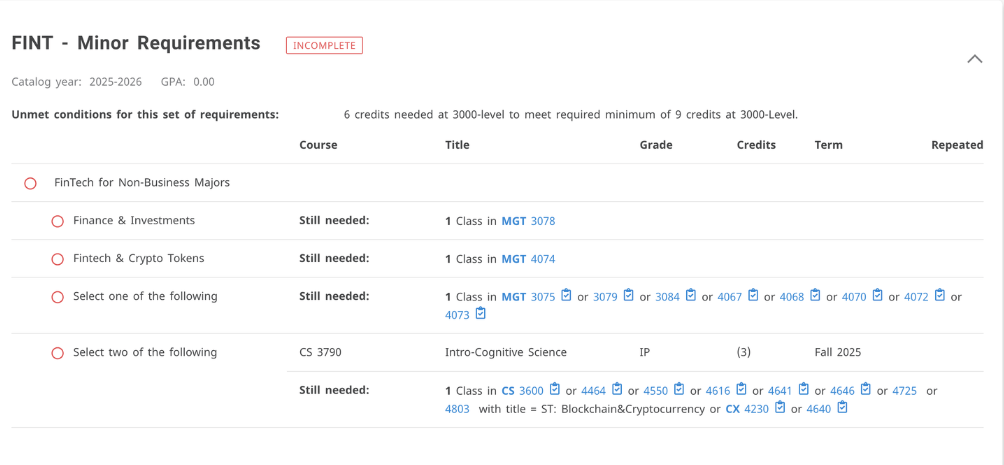
Screenshot of DegreeWorks sample containing class requirements to complete a Fintech minor without a major in Business. The image contains options for classes to take (with class IDs) to satisfy each requirement.
Step 3: Checking Prerequisites
Before finalizing the list, check each course for prerequisites in DegreeWorks or the OSCAR course catalog. Some advanced classes require foundational ones first, which may only be offered in specific semesters. Mark these early prerequisites as high-priority for registration, since completing them will unlock more course options later.
Planning Your Schedule
Once you’ve researched which classes you need, the next step is to plan when and how to take them. This phase focuses on building a curated semester schedule by balancing workload, extracurriculars, and personal preferences. By comparing class times, professors, and section options, you can create multiple possible schedules before registration opens. Planning early will help you secure the classes you want and avoid scheduling conflicts.
Step 4: Exploring Classes Offered
Use GT Scheduler and Course Critique to find which classes are available for the upcoming semester.
- Check if required classes are offered in your term and note the section numbers, days, and times.
- If a class isn’t offered this semester, flag it for a future semester.
- Record each course’s CRN (Course Reference Number) since you’ll need it later for registration.
Start your planning with the most restrictive classes. These would be classes with fewer sections or limited availability because these will determine how the rest of your schedule fits together.
Step 5: Comparing Professors and Sections
Not all sections of a class are the same. Use Course Critique to review historical grade distributions and RateMyProfessor to review past feedback for each professor. Particular information to keep in mind would include the following:
- Average GPA trends, which can signal grading style or course difficulty (Course Critique).
- Teaching methods (RateMyProfessor).
- Map out section times and locations, since some may fit better around labs or extracurriculars (GT Scheduler).
Selecting the right professor can make a big difference in your classroom learning experience, GPA, and workload.
Step 6: Combining Classes Into Schedule Combinations
Once you’ve identified your preferred classes and professors, build potential schedules using GT Scheduler. Create at least two versions, one of your ideal plan and one with a back-up plan. Start off with planning around the most restrictive classes from Step 4. From Step 5, for classes with more sections, professors, and timings, create different combinations with preferred professors, timings, and locations. Having plans ahead of time ensures that when your time ticket opens, you can register quickly without scrambling to find replacements for full sections. While making these plans, keep in mind the following:
- Check for time conflicts and total credit hours to make sure the workload is manageable.
- Stay organized by color-coding different classes and naming each plan accordingly (GT Scheduler).
Tip: Check that the timing and locations of your classes allow you to get from one to the next without rushing. GT Scheduler has a map feature!
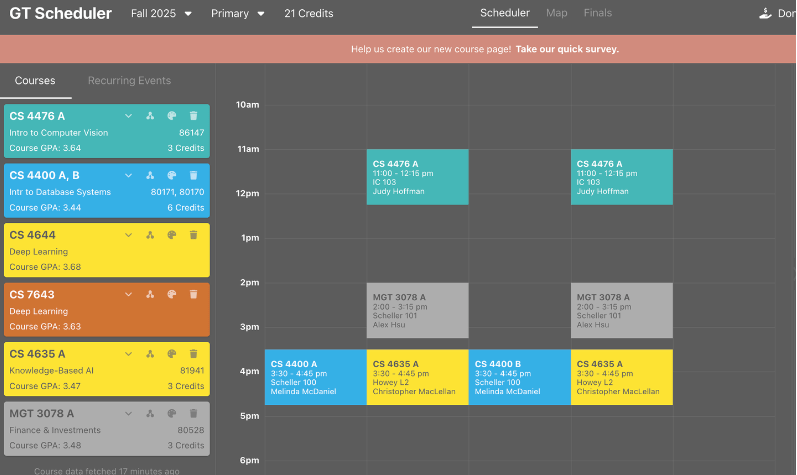
A mock schedule in GT Scheduler with color coded classes, showing the course ID, timing, location, and professor for each section.
Registering for Classes
After finalizing your planned schedules, you’re can move into the actual registration process. This stage involves tracking class availability, preparing plans in OSCAR, and using efficient methods to add classes when your time ticket opens.
Step 7: Monitoring Class Availability
In the days, and even hours, leading up to your time ticket, keep an eye on which classes still have open seats. You can do this by checking OSCAR regularly to see real-time updates on class capacity and availability. Update GT Scheduler and amend your plans accordingly, prioritizing classes that are filling up quickly, like electives or labs. You may have to repeat Steps 4-6 if many classes in your ideal plan become full. By monitoring your desired classes, you can prepare in advance to dynamic class enrollment.
Step 8: Preparing Plans
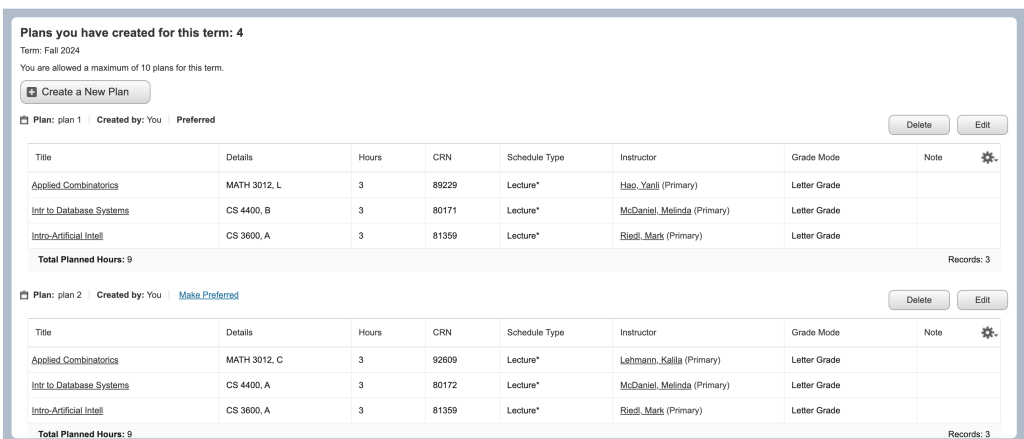
Soon before registration opens, build your OSCAR Plans based on the schedules you created earlier in GT Scheduler. To do this quickly, add each course using its CRN. Once you have added your classes, double-check the times, days, and professors to ensure they match to the exact section you intended in GT Scheduler. Create multiple plans and label them clearly, as done in Step 6. When your time ticket opens, you can load these saved plans and register for multiple classes instantly, instead of having to entier each CRN one at a time.
Step 9: Adding Courses to Your Schedule
As soon as your time ticket becomes active, log in to OSCAR and register using your saved plan by clicking “Add All” to import all classes at once. After submitting, ensure that all courses appear in your “Current Schedule.” If an error occurs, such as a time conflict or full class, move to your backup plan or search classes individually using either of the following ways:
- Enter the CRN manually and submit.
- Search the class directly in OSCAR using the course ID (i.e. MATH 1554), which is slower and should only be used for exploration or last-minute changes.
Post-Registration
Once registration is complete, you have two avenues. If you got all the classes you wanted, congratulations! You are done with the registration process for this semester! If you did not, you now have to shift to monitoring changes in class enrollment to see if new seats open up. Staying organized during this phase will help you secure the best possible schedule for your semester.
Step 10: Exploring Other Class Options
If a class you wanted is full, there are several ways to find alternatives to take, as follows:
- Some classes are listed under multiple course codes so make sure to check for cross-listed sections.
- Within the same course, there may be an earlier or later section that fits your schedule.
- Use DegreeWorks to find similar courses that still satisfy the same requirement.
You can also check in again with your advisor for tips they may have on replacement courses.
Step 11: Setting Up Notification Monitoring
If your preferred class is full, use Coursicle to get alerts on your phone when a seat opens. Coursicle allows you to track multiple classes and sections and sends a push notification as soon as a spot becomes available. When you get the notification, you can quickly sign up for the spot, rather than refreshing OSCAR’s registration page constantly. However, make sure to keep you CRNs handy so you can add the class immediately without wasting any time. Classes fill up within minutes, so it is essentially to be efficient.
Summary
In summary, here is a general overview of the steps you need to take in order to optimize your schedule, and a general comparison of all the tools mentioned in this tutorial! Once you have gathered all your classes according to your satisfaction, you are good to go!

Sources:
- GT Scheduler. (2025). GT Scheduler. https://www.gt-scheduler.org/
- Course Critique. (2024, August 14). Course Critique. https://critique.gatech.edu/
- Rate My Professors. (2025). Georgia Institute of Technology professors. https://www.ratemyprofessors.com/school/361

Leave a comment