

By Ashmitha Julius Aravind, Adil Farooq, and Christopher Lee
Collaboration on GitHub is trivial when done right, but all too often the best practices and protocols are ignored leading to chaos in the repository, lost code, and dreaded merge conflicts. This guide covers the best practices and what to do when they aren’t followed.
Introduction
This is a guide regarding how to use GitHub in a collaborative manner, rather than simply as cloud storage or version control for your code. This guide will assume that you are already familiar with the basics of Git and GitHub, including how to git commit, push, pull, repository creation, etc., and that you already have a GitHub account and are familiar with the site. This guide will cover how to best work in teams, how to avoid issues and what to do when issues are encountered. Specifically the guide covers best practices for team GitHub repository management and dealing with branches, and how to deal with merging and merge conflicts.
- Part 1: Setting Up Your Team on Github
- Part 2: Best Practices: Branches and Pull Requests
- Part 3: Merge Conflicts
- Conclusion
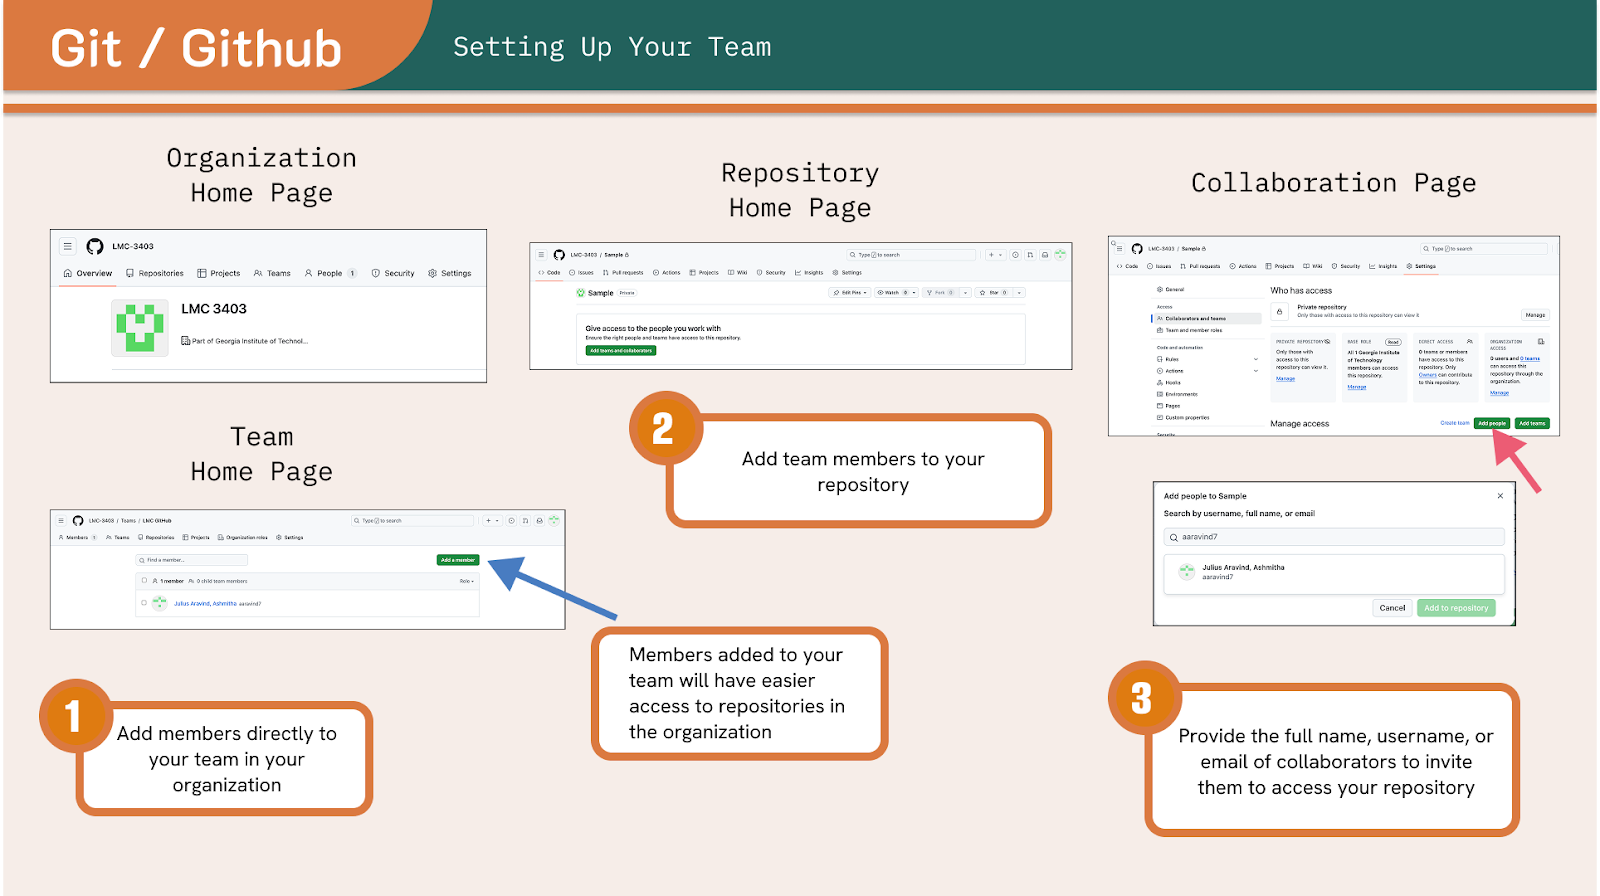
Part 1: Setting Up Your Team on GitHub
- Step 1: If you intend to work only with other Georgia Tech students and for an internal audience, use your Georgia Tech Enterprise GitHub account, otherwise use a personal GitHub. The enterprise offers additional benefits (security, IP protection, extra storage, premium features) but it does not allow the addition of non-GT GitHub users to the team or repository.
- Step 2: Next, if your project is small or self-contained, it is best to create and share a single repository. However, if you are working on a larger project it may be better to create an Organization on GitHub and then create your repository within that.
- Pro-Tip: assign an individual to create and manage the repository/organization!
- Step 3: If you’ve set up an organization, members may have access to a repository owned by the organization (depending on the organization’s rules), but like an independent repository, collaborators can be directly added and given access to the repository.
- This is done by navigating, within the repository on GitHub, to Settings > Collaborators > Manage Access, and clicking on Add People. Then you can provide the username, full name, or email of the desired collaborator to invite them.
- Do note that you should not attempt to add users by searching for them in the “Find a collaborator…” search bar. Deceptively, that bar is only used to search amongst existing collaborators.
Part 2: Best Practices: Branches and Pull Requests
- Step 1: Most repositories start with a single branch entitled “main” (sometimes “master”). Best practices dictate that each collaborator creates a new branch from main (say, branch “main_collaborator-name”) and pushes their edits to that branch. Furthermore, each individual should be given distinct tasks, i.e. working on separate folders, files, classes, methods, algorithms, etc.
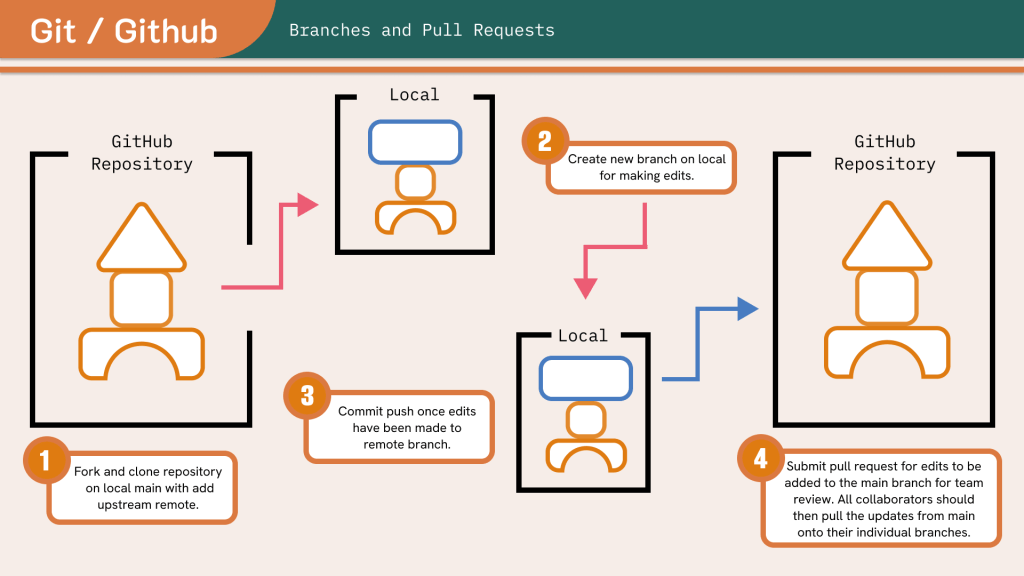
Pro Tip: If you need a refresher on Git Branching and Merging, check out the official documentation from Git!
- Step 2: Periodically, users should push their work to their remote branch on GitHub. When their given task is complete, they should submit a Pull Request on GitHub, essentially requesting that the updates from their branch be added to the main branch. The manager or another assigned individual should handle the resolution of these Pull Requests.
- If all has gone well, if users have worked on separate items, GitHub should be able to automatically complete the Pull Request and update of main.
- If not, you most likely have a merge conflict! See Part 3.
- Step 3: After the Pull Request has been completed, and once other team members’ updates have been pulled into the main branch, all collaborators should pull the updates from main into their individual branches so they are working with the latest code. This should definitely be an automatic process as the earlier pull request to main should have handled any merge conflicts. Then the process repeats and you keep working on your code!
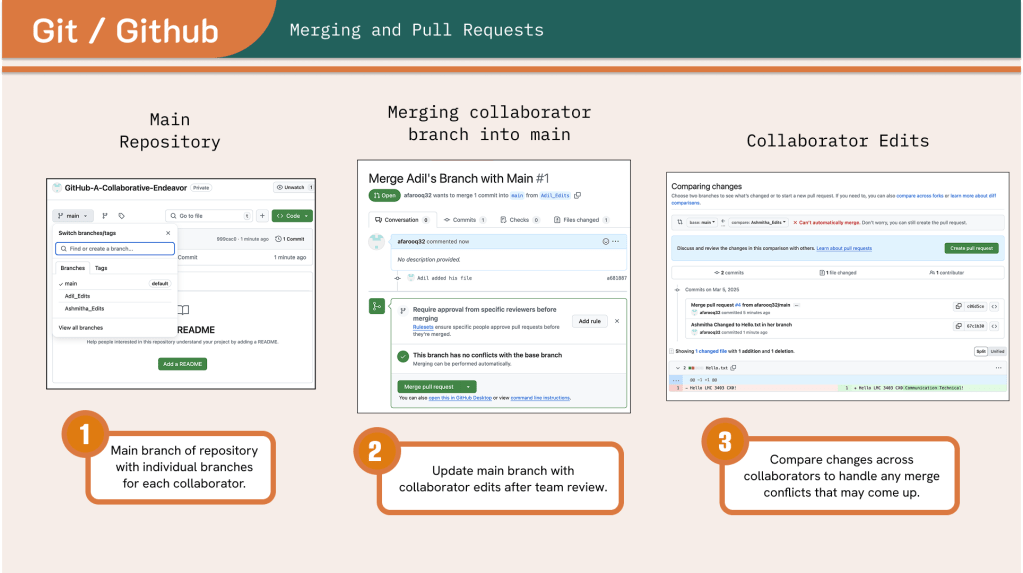
Part 3: Merge Conflicts
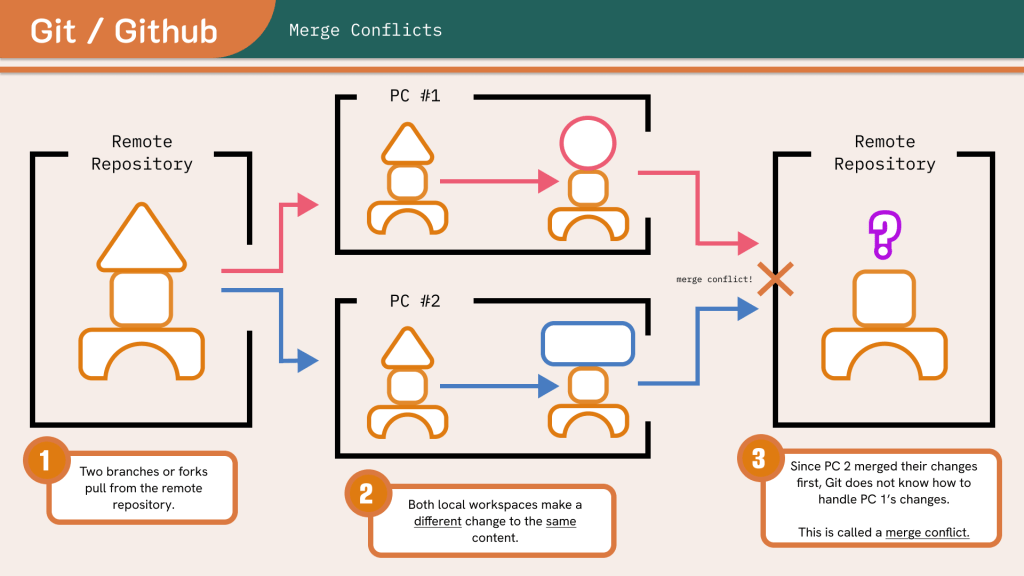
- Step 1: If GitHub is unable to automatically resolve a pull request, this means that the code in the main branch that you are trying to update by pulling in changes from another branch has already been updated from a different branch in a different way. For example:
- Original code:
System.out.println(“Hello World”); - Branch 1 code:
System.out.println(“Hello Georgia Tech!”); - Branch 2 code:
System.out.println(“Hello Atlanta!”); - First, Branch 1 is automatically merged into the Main Branch
- Then you attempt to merge Branch 2 into the Main Branch
- Now, Git can’t treat Branch 2’s version as an update to the Main Branch, because the changes first made by Branch 1 to Main are not accounted for by Branch 2. Git doesn’t know what to do!
- Original code:
- Step 2: If the main branch pulled branch one’s code in first (or branch two’s, the order doesn’t matter in this scenario), then when GitHub tried to pull branch two’s code in, it doesn’t know whether “Georgia Tech!” or “Atlanta!” is the correct replacement for “World”. There are several different ways to resolve such a situation.
Pro Tip: Check out the official Git documentation on Merging, as well as guides from GitHub and Atlassian!
- Step 3: If you’ve set up an organization, members may have access to a repository owned by the organization (depending on the organization’s rules), but like an independent repository, collaborators can be directly added and given access to the repository.
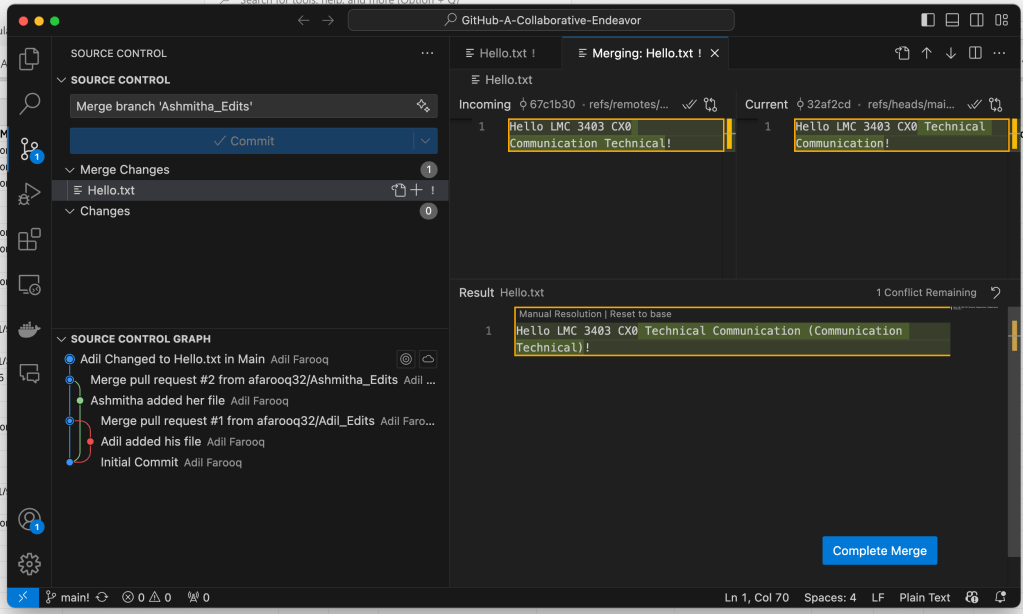
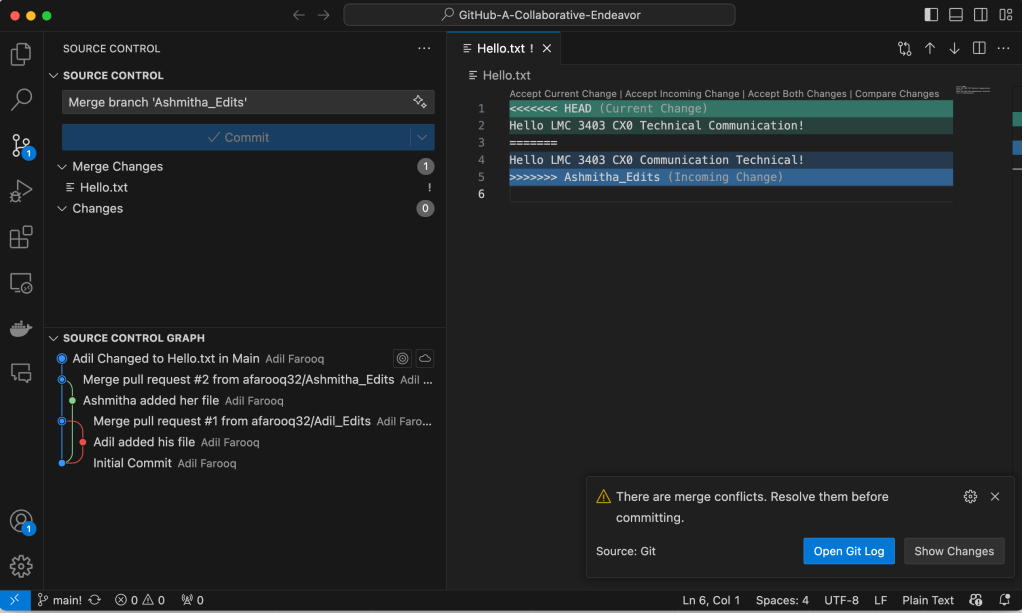
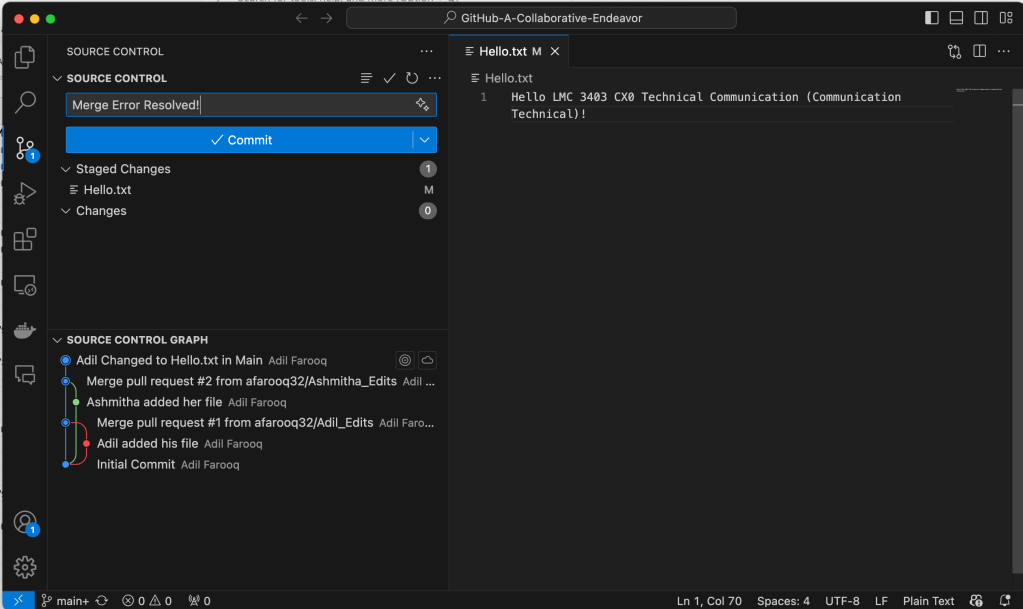
- Option 1: The Simplest, Most Powerful, and Most Annoying: Manually Fix It
Often, you’ll have no recourse but to inspect the code yourself and fix the error. To do this, open the code in your chosen IDE, say VS Code, and attempt to pull the code from the branch into main. VS Code will inform you of the error and open a merge conflict resolution screen which will show you both versions of the code, allowing you to choose one over the other, or combine the two yourself.
- Option 2: Force a Branch to Preferred over the other:
- On your computer, in the command line / terminal, run the code:
git merge -X <ours/theirs> <source_branch>- i.e.
git merge -X ours branch_one
- If you choose the option “ours” then the main branch’s version will be preferred in the event of a conflict, if “theirs” then the branch being merged will be preferred in case of conflicts.
- On your computer, in the command line / terminal, run the code:
- Option 3: There are actually dozens of further ways to resolve a merge conflict. So if the previous two solutions do not best resolve your specific scenario, Google, StackOverflow, and the world wide web are your best friends!
Conclusion
We hope that this guide has provided you with all the tools you need to collaborate on GitHub, follow best practices, and face any issues that arise. If there is one lesson you should take away, it is that the best way to face merge conflicts is to ensure that they never happen by enforcing strict work on different sections of code on different branches by different team members.
Sources
- https://docs.github.com/en/pull-requests/collaborating-with-pull-requests/addressing-merge-conflicts/resolving-a-merge-conflict-using-the-command-line
- https://support.atlassian.com/bitbucket-cloud/docs/resolve-merge-conflicts/
- https://git-scm.com/book/en/v2/Git-Branching-Basic-Branching-and-Merging
- https://git-scm.com/docs/git-merge
- https://stackoverflow.com/questions/161813/how-do-i-resolve-merge-conflicts-in-a-git-repository
- https://community.atlassian.com/forums/App-Central-articles/Advanced-Git-merge-conflict-resolution-techniques/ba-p/2476971
- https://git-scm.com/book/ms/v2/Git-Tools-Advanced-Merging

Leave a comment